In this doc, we will learn “How to Configure SSL for Tenant Domain in Multi-Tenant SaaS eCommerce Module”.
What is SSL or TLS ?
SSL stands for Secure Socket Layer.It is a transport layer protocol which is used to establish a secure connection between server and client.When you visit an SSL integrated website the connection between your browser and the website is secure. All the data transmits in encrypted form.
TLS stands for Transport Layer Security . It is the successor of SSL. TLS evolved from Secure Socket Layer (SSL). SSL version 3.1 become TLS version version 1.0 .
What is Let’s Encrpyt?
As per letsencrypt.org , it is a free and automated open certificate authority ( CA ) .
It provides people the digital certificates they need in order to enable (SSL/TLS) in websites for free . Hence, it is running entirely on donation by the users. You can also donate to Let’s Encrypt by clicking on this link .
Now, let’s come to the topic again:
Technologies Used:
1- Ubuntu 18.04
2- Apache Web Server
Steps to Configure SSL using LetsEncrypt
Step-1: Ask the client domain
Ask the domain name of client for which you are going to configure SSL. In our case the domain name is bagotest.tk .
Step-2: Login to your Server
Login through SSH in your Server as root user so that you can execute the commands without any permission issue.
The most general command for SSH in a server is mentioned below:
|
1 |
ssh server_username@IP_address_of_server |
Step-3: Generate SSL Certificate
Now generate the SSL Certificate using the commands below:
|
1 2 |
apt-get install certbot certbot --server https://acme-v02.api.letsencrypt.org/directory -d domain_name -d *.domain_name --manual --preferred-challenges dns-01 certonly |
Note: Use client domain name in place of domain_name in the mentioned command
During Certificate Generation, Let’s Encrypt will ask for certain information . Complete the information according to your choice.
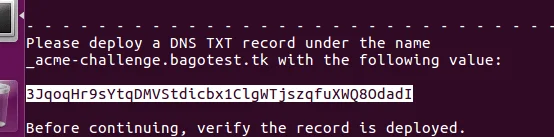
Step-4: Enter TXT Records
For domain verification , let’s encrypt generate TXT records . You have to enter those TXT records in your Domain’s DNS Management Console. Only after successful verification, you SSL Certificates will be generated.
The TXT records will look like this in the image below:
Step-5: Check Certificate path
Now, check the path of certificate files in server after certificate generation .
By default, the path is /etc/letsencrypt/live/domain_name .
At this path you will find 5 files named:
README
cert.pem
chain.pem
fullchain.pem
privkey.pem
We are going to use cert.pem fullchain.pem privkey.pem in SSL Configuration .
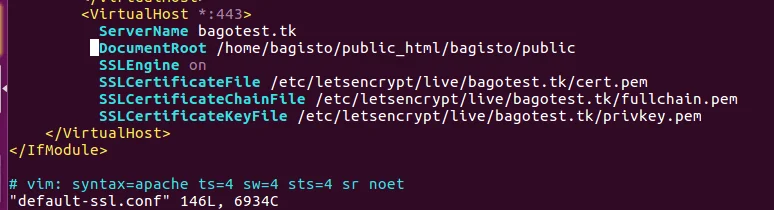
Step-6: Configure Web Server
We now have to configure web-server to use SSL for a particular domain. Here we are using apache .
Go to the apache configuration file.
Here, we are using the default configuration file . Path of default configuration file is :
|
1 |
/etc/apache2/sites-enabled/default-ssl.conf |
Open this file and add the below provided code before </IfModule> in the file.
|
1 2 3 4 5 6 7 8 |
<VirtualHost *:443> ServerName domain_name DocumentRoot /path/of/your/bagisto/files SSLEngine on SSLCertificateFile /etc/letsencrypt/live/domain_name/cert.pem SSLCertificateChainFile /etc/letsencrypt/live/domain_name/fullchain.pem SSLCertificateKeyFile /etc/letsencrypt/live/domain_name/privkey.pem </VirtualHost> |
Note: Change domain_name with your tenant domain name
The demo image is provided below:
Step-7: Restart the Webserver
After the webserver configuration, you need to restart the webserver to load the updated configuration.
Hence, to restart apache in Ubuntu the commad is:
|
1 |
service apache2 restart |
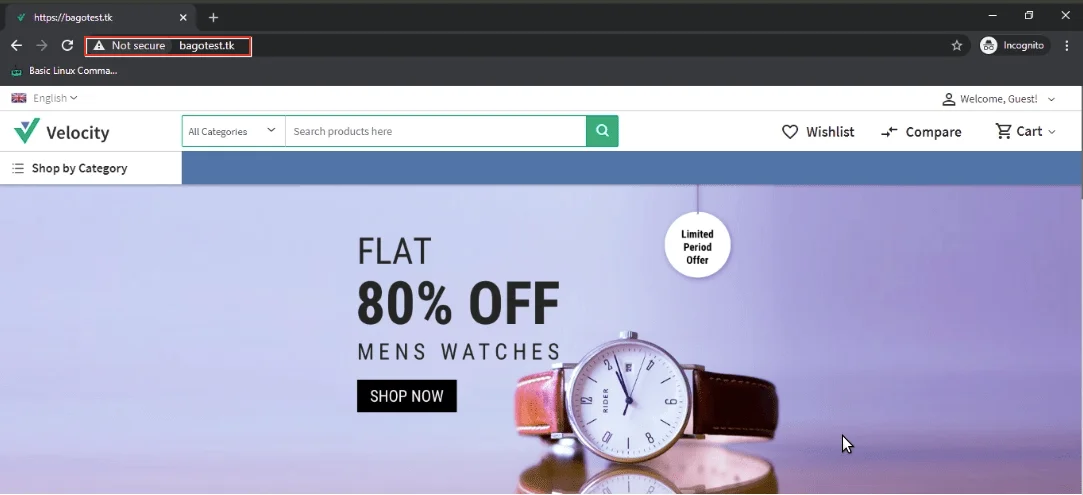
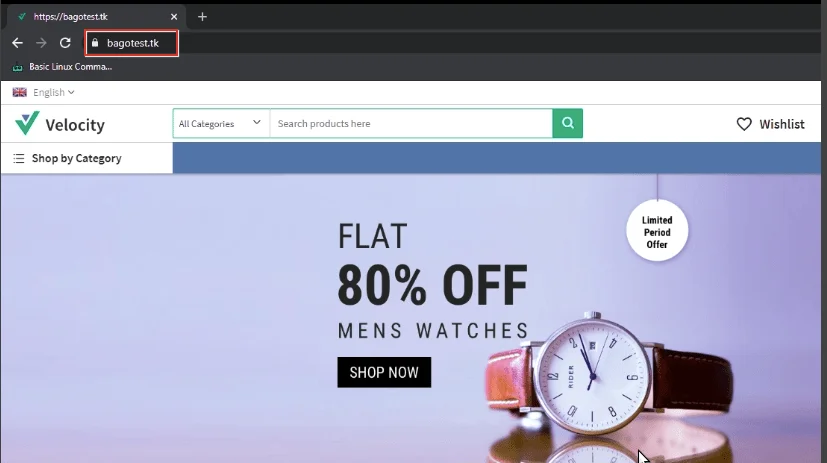
Compare the Difference Before and After SSL Configuration
The two images shows the difference before and after SSL configuration
SSL is not configured in Image 1 .
SSL is configured in Image 2 .
Remember, the Let’s Encrypt Certificates expires after every 90 days, so you have to update your SSL certificates after every 90 days .
Thank you for reading this blog. You can also check my other blogs on Create CNAME Record for Laravel eCommerce Multi-Tenant SaaS Module and How to Map Tenant Domain with CNAME in Multi-Tenant SaaS eCommerce Module
In case of any help or query, please contact us or raise a ticket at https://bagisto.uvdesk.com/en/.


Be the first to comment.