Bagisto Visual Editor lets you build and customize your store without coding, making it simple for both beginners and developers to create professional layouts.
It offers an easy drag and drop interface to design pages, set up layouts, and manage content smoothly.
You can reuse sections and apply styles quickly, helping you design a clean, modern, and responsive store.
These reusable elements and flexible styling options also help maintain consistency across your store while saving time.
Watch Bagisto Visual in Action
Check out all the features like installation, setting up the theme, using the visual editor, and customizing by watching this complete walkthrough video.
Get Started with Bagisto Visual
Before you begin, ensure:
1) PHP version 8.2 and above
2) Bagisto version 2.3 and above
Step 1: Install Bagisto Visual
Install via Composer:
|
1 |
php artisan vendor:publish tag=visual assets |
Step 2: Install the Starter Theme
Install the default Visual theme:
|
1 |
composer require bagistoplus/visual debut |
Publish the theme assets:
The theme will now be visible under the Bagisto Visual → Themes menu in your admin panel.
Click “Customize” to launch the editor.
Step 3: Launch the Visual Editor
Once inside the visual editor, you can:
1) View your store in real time
2) Switch between devices and languages
3) Add, rearrange, and edit page sections
Step 4: Add & Edit Sections
To add a section:
1) Click “Add Section” in the sidebar
2) Choose a block (e.g., Hero, Featured Products, Newsletter)
3) Click the section to modify text, links, or images
4) Preview changes live
Step 5: Create a Custom Section
Use Artisan to generate a new section:
|
1 |
php artisan visual:makesection MyBanner |
This will create:
-
A PHP class:
app/Visual/Sections/MyBanner.php -
A Blade file:
resources/views/sections/mybanner.blade.php
Edit the files to define your own layout and settings.
After following these steps, the Bagisto Visual extension should be successfully installed and ready for use in your Bagisto project.
You will also see the Bagisto Visual menu item in the admin sidebar, where you can access the Themes and launch the Visual Editor.
 Features
1) Visual Editor: Create pages that show a live preview without needing to code.
2) Standard Theme Framework: Utilize organized parts to speed up the development process.
3) JSON Based Layouts: It’s easy to arrange and manage various parts of a page.
4) Prebuilt & Custom Sections: You can use pre made blocks or make your own.
5) User Friendly: Change banners and content on your own without needing a developer’s help.
6) Developer Ready: Expand with Blade and Livewire
7) Multilingual Support: Functions in various languages
8) Admin Control: Easily handle themes and permissions.
9) Responsive Preview: Look at how the layouts appear on desktop, tablet, and mobile devices.
Bagisto Visual Customization
When you get to the Admin Dashboard, go to Bagisto Visual →Themes→Custoimize from the menu on the left.
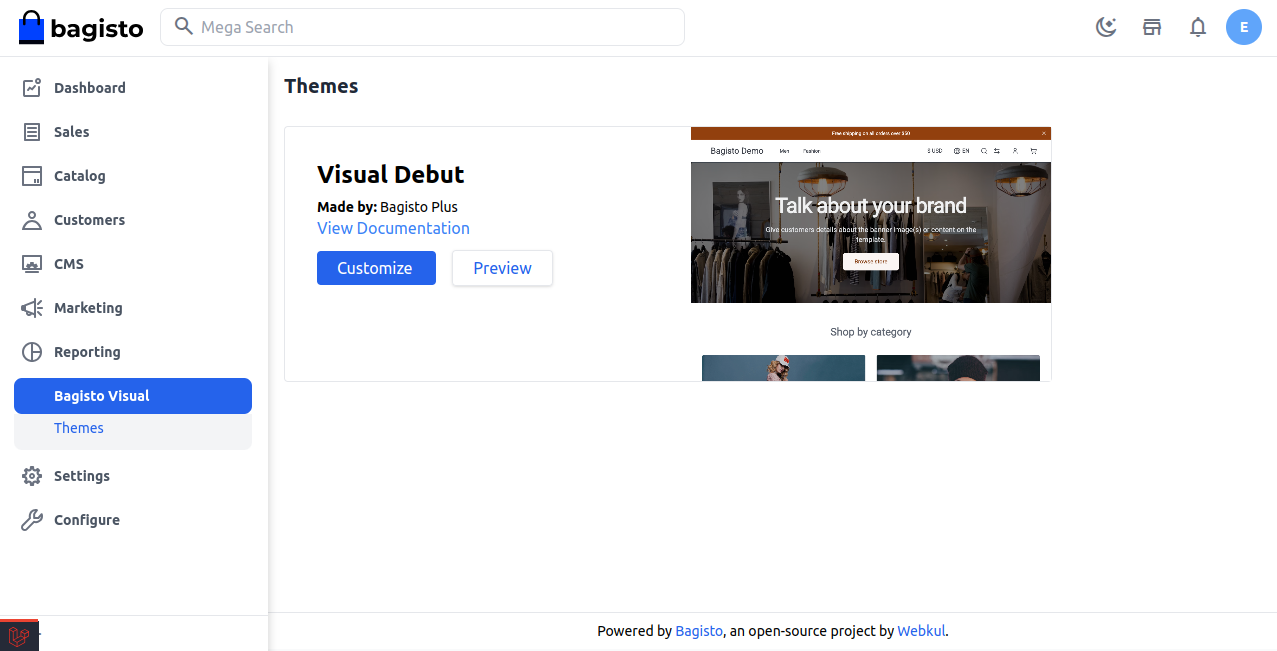
Let’s move on with each functionality.
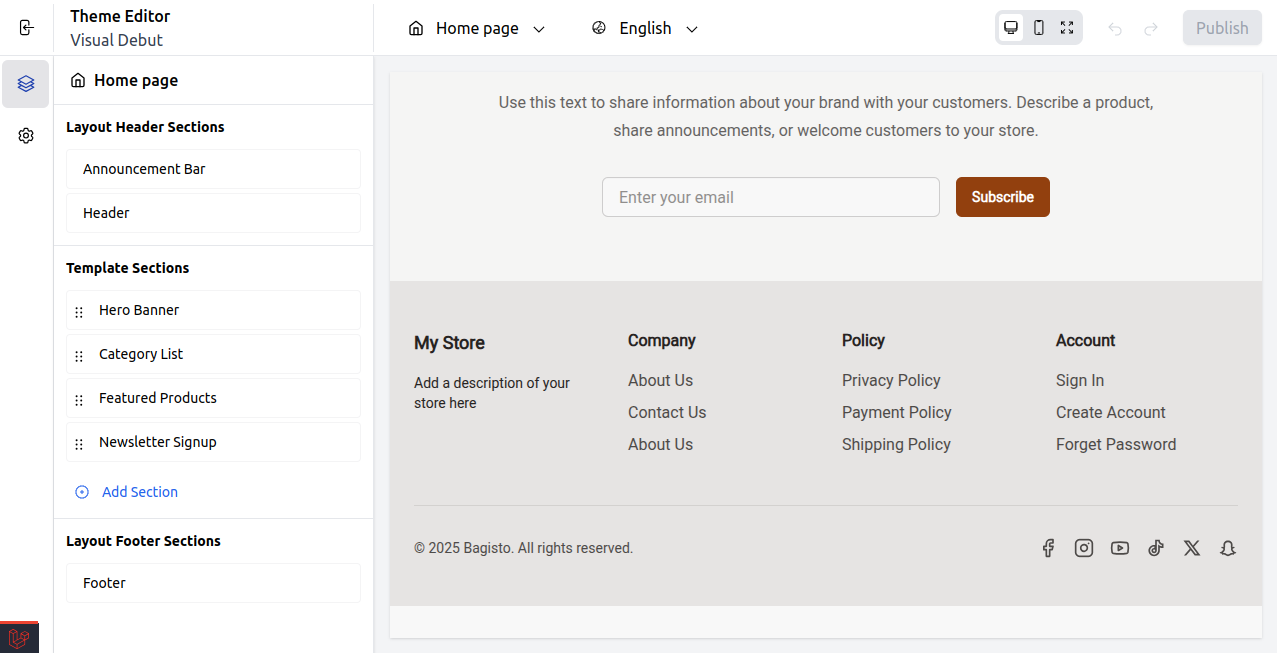
Layout Header Sections
In Bagisto Theme Customizer, the Layout Header Sections are parts that you can change and design easily.
These header sections give you complete control over how your storefront looks and works at the top, all from the visual interface.
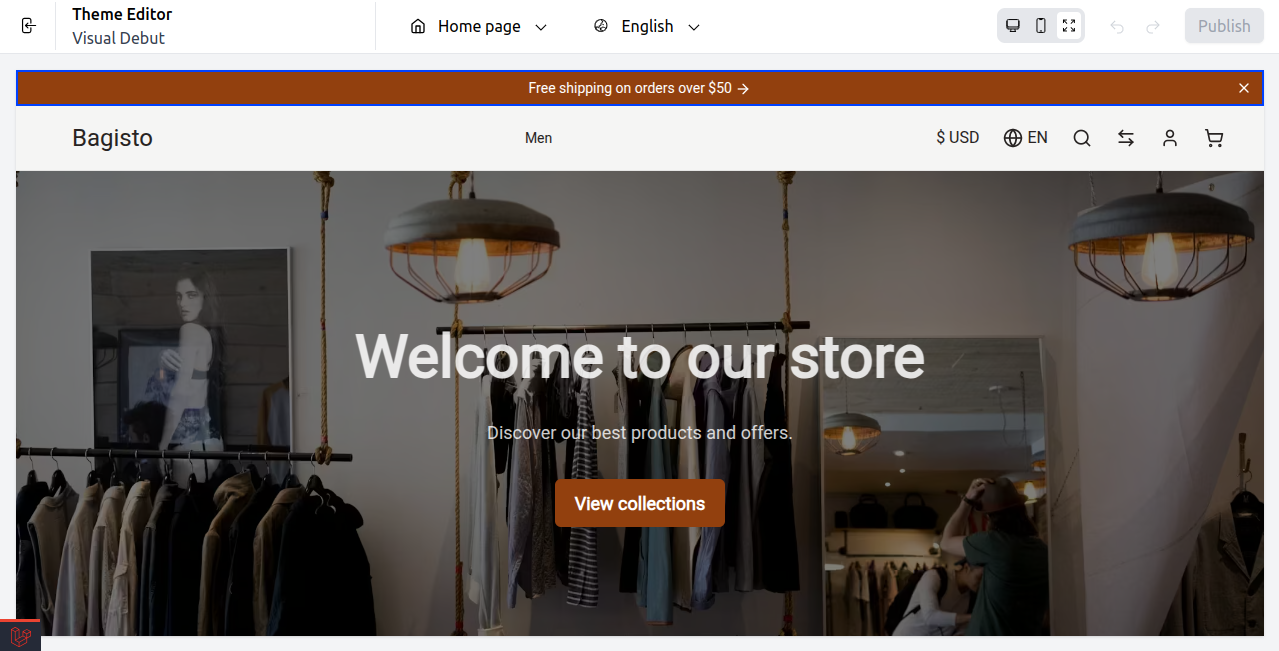
1) Announcement Bar
A section at the top that shows promotional messages, or updates. You can easily change its text, style, and visibility with the visual editor.
Announcement Bar Settings
Select Announcement Bar under the Layout Header Section.
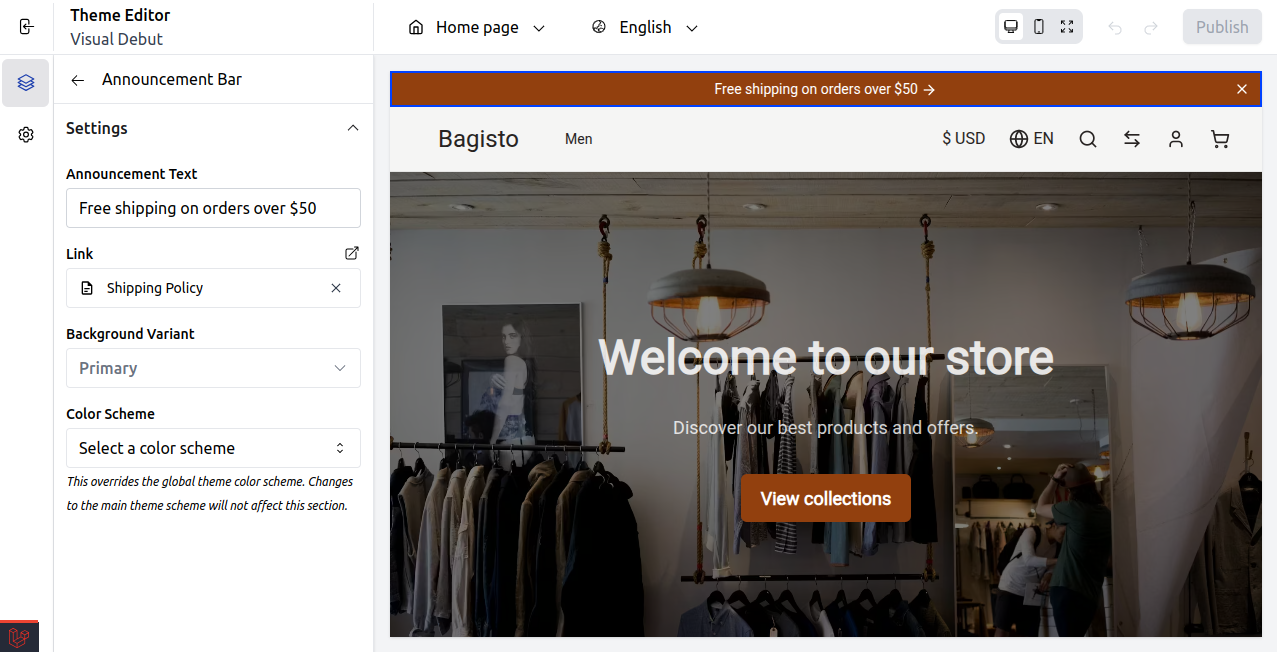
- Announcement Text: This is the message that appears in the announcement bar.
- Link: This is the URL that users go to when they click on the announcement.
- Background Variant: This is the style setting for the background of the announcement bar.
- Color Scheme: This sets the combination of text and background colors to make them stand out visually.
At last, publish the changes.
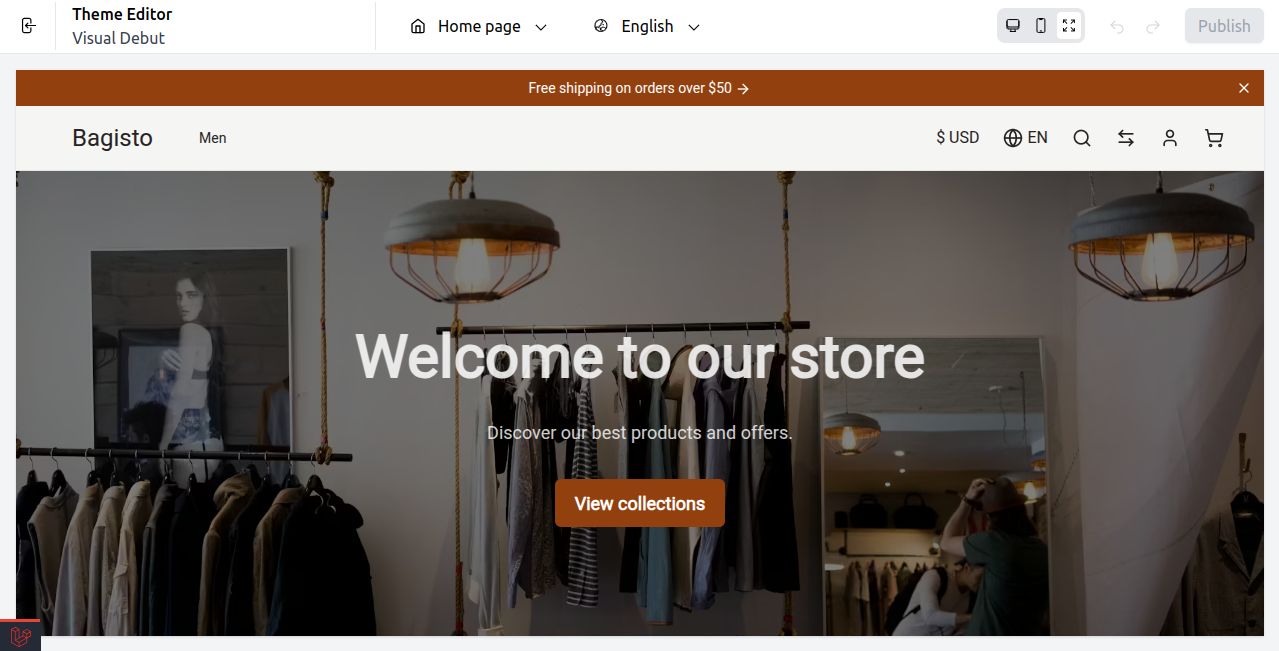
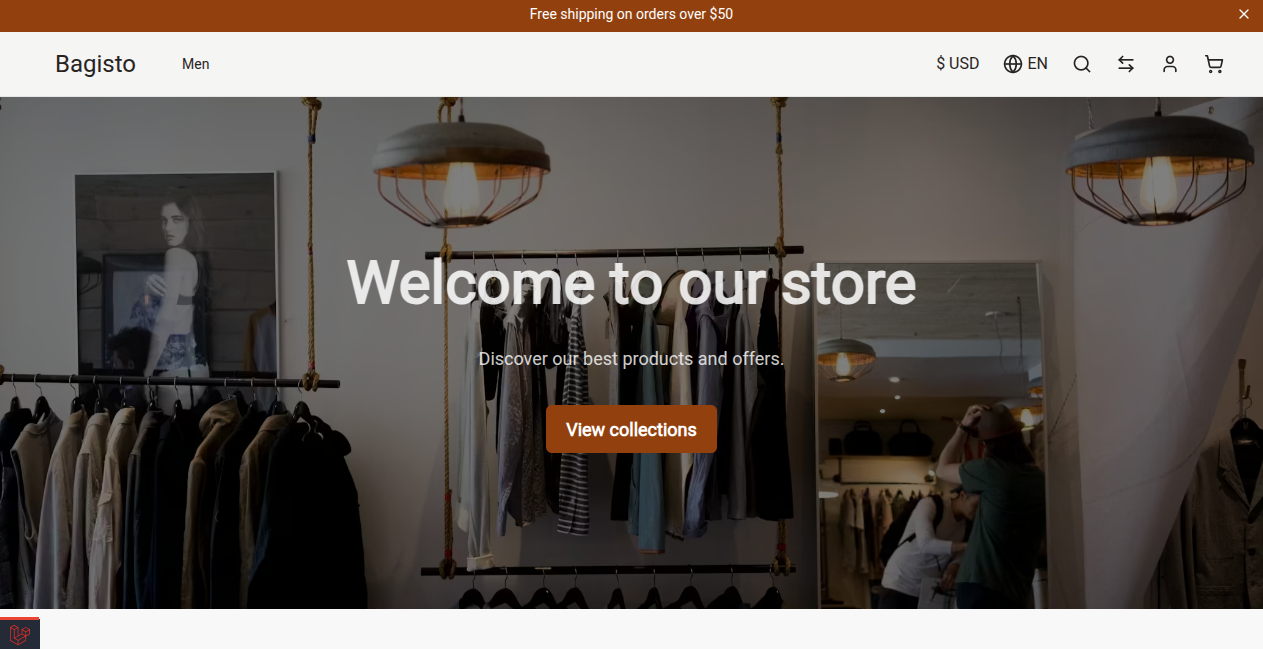
Front End
The announcement message appears clearly at the top of the store page, as shown in the image below.
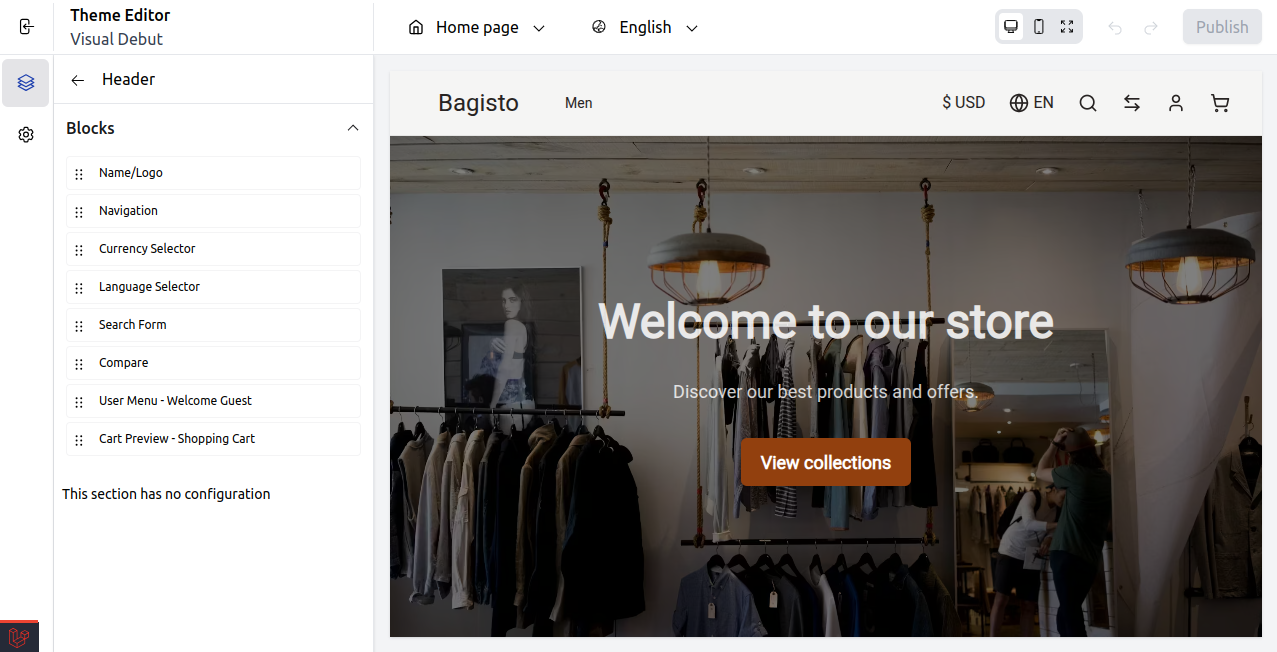
2) Header
This is the main upper part of your store, usually featuring the logo, navigation menu, search bar, cart icon, and links for user accounts.
It allows you to easily drag, drop, and customize these elements without needing to write any code.
Header Blocks Settings
Select Header under the Layout Header Section.
Name/Logo
Shows your store’s name or logo that links back to the homepage.

- Upload Logo: Choose the main logo image for your store.
- Mobile Logo: Upload a logo that is meant for mobile viewing.
- Logo Text: This is the text that appears if you haven’t uploaded a logo image.
- Push to Start: This option moves the logo to the start of the header.
- Push to End: This option moves the logo to the end of the header.
- Alignment (Left/Center/Right): This setting lets you control where the logo is placed horizontally.
Navigation
Displays the main menu links to help users navigate your site.

- Push to Start: Aligns the navigation menu to the left.
- Push to End: Aligns the navigation menu to the right.
Language Icon
Allows users to switch the language icon for better understanding.

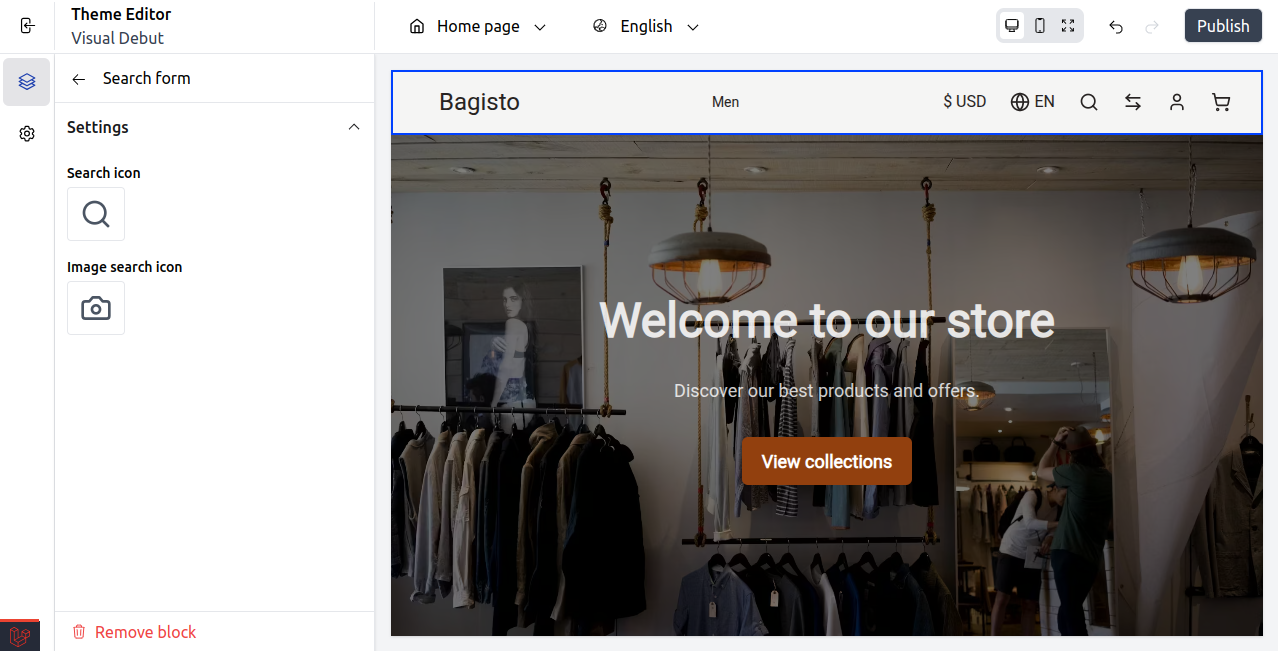
Search form
Allows users to change the Search icon and Image search icon for better understanding.
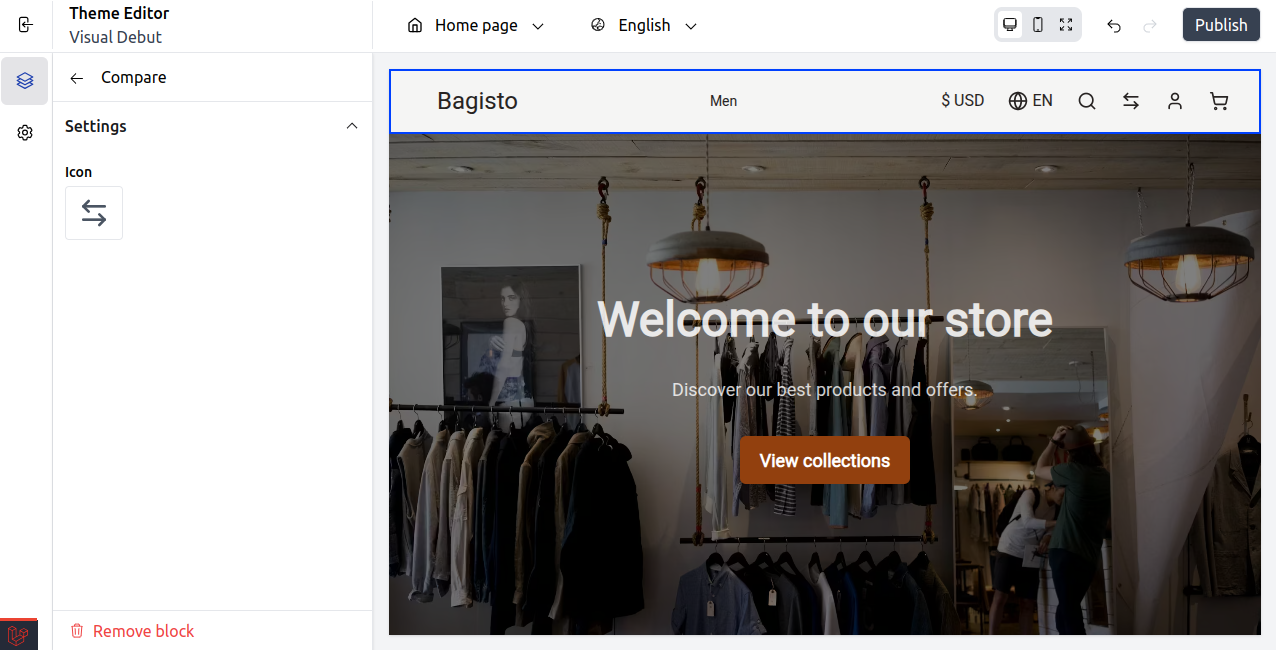
Compare
Enables users to look at several products next to each other and change the icon as well.
User menu Welcome Guest
Shows options to log in or register, or greets users who are already logged in.
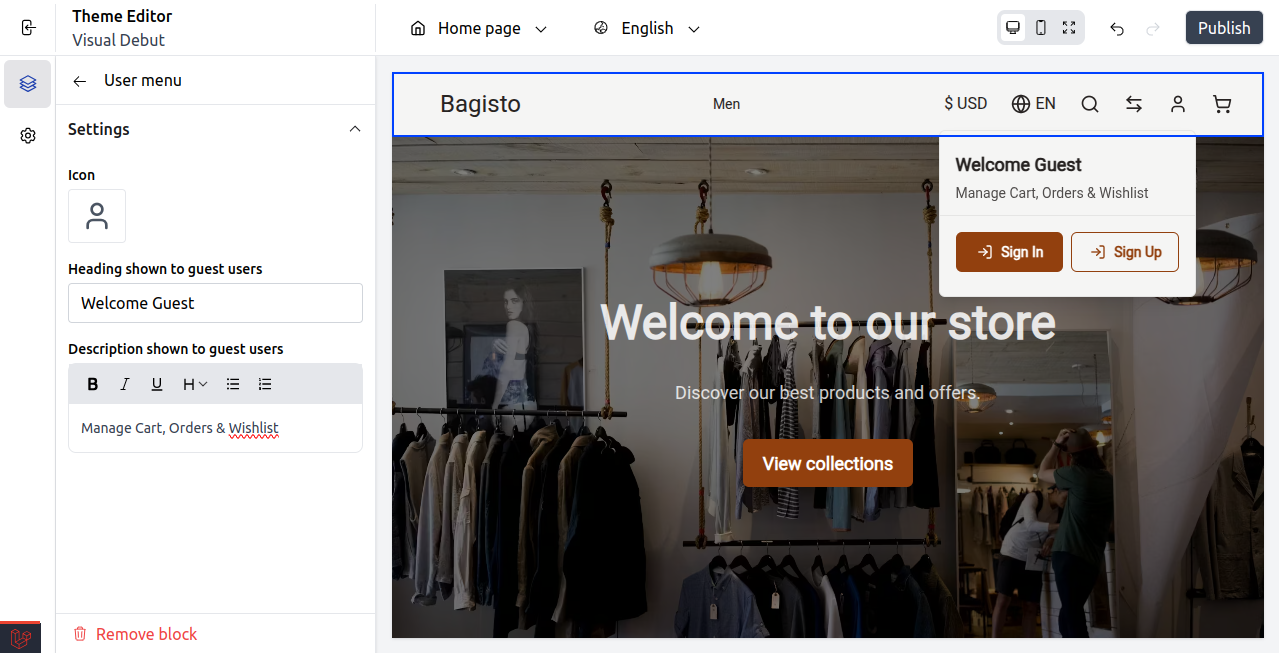
- Icon: Shows a user icon for logging into your account.
- Heading (Welcome Guest): This is what users see when they are not logged in.
- Description: A short message or prompt for guest users that appears below the heading.
Cart preview Shopping Cart
Displays a drop down view of the items that have been added to the cart.

- Heading: Displays the cart title.
- Description: Promotional text shown below the heading.
At last, publish the changes.
Front End
The Header Block will be visible as given below on the front end.
Template Section
Ready made layout blocks that help you design and personalize your store’s look.

1) Hero Banner
It’s a big banner that has words and buttons to show important stuff.
Hero Banner Setting
Select Hero Banner under the Template Section.
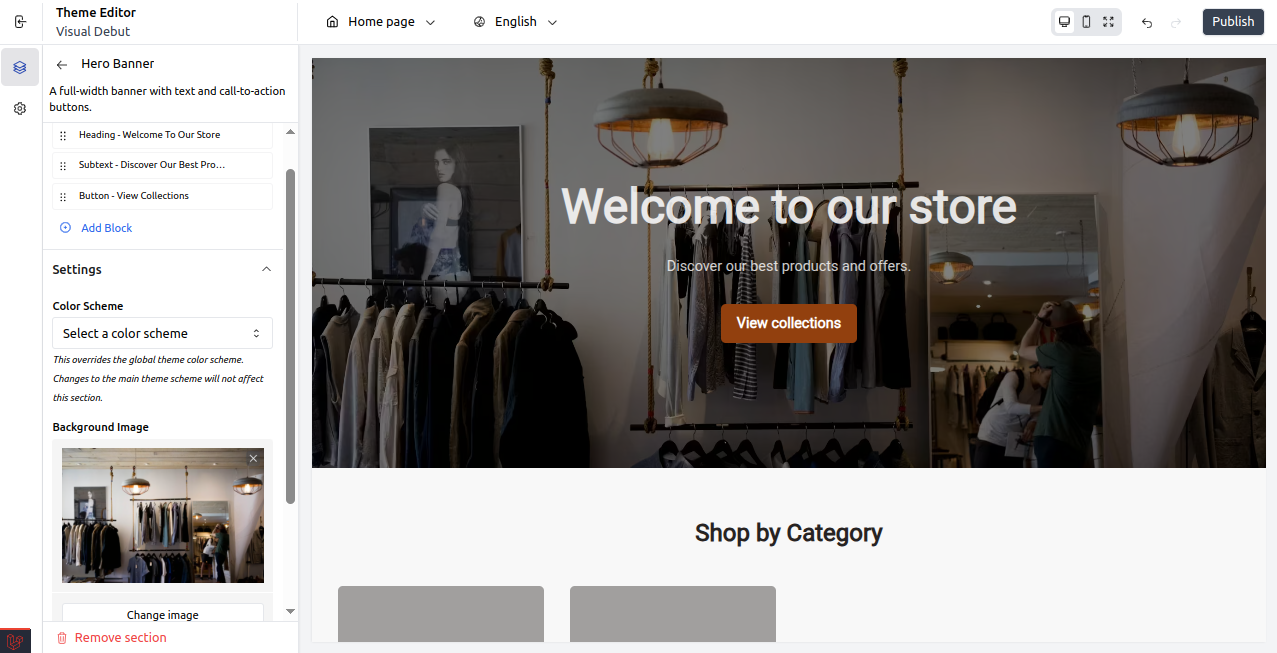
- Heading: This is the main title that you see on the banner.
- Subtext: This is the extra text that goes below the heading.
- Button: This is a button you can click to help users (like “View collections”).
- Add Block: You can add new things like text or buttons to the banner.
- Color Scheme: You can change the colors of the banner separately from the main colors.
- Background Image: You can upload or change the picture behind the banner.
- Overlay Opacity (%): This controls how transparent the overlay on the image appears.
- Banner Height: This sets how tall the banner looks (like medium).
At last, publish the changes.
Front End
The Hero Banner will be visible on the front end, as given below.
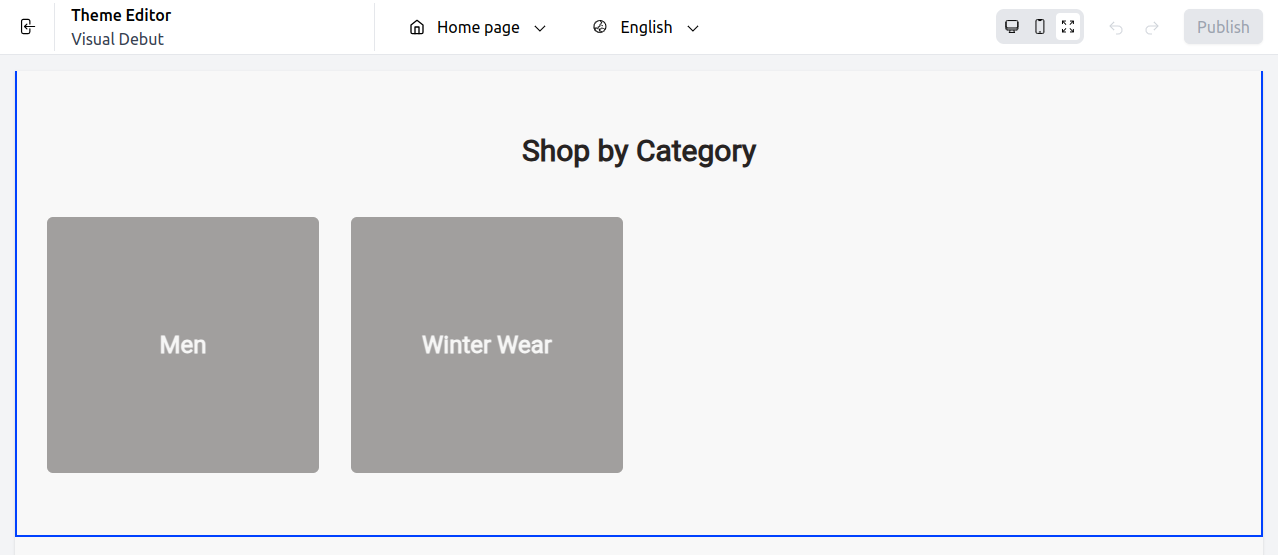
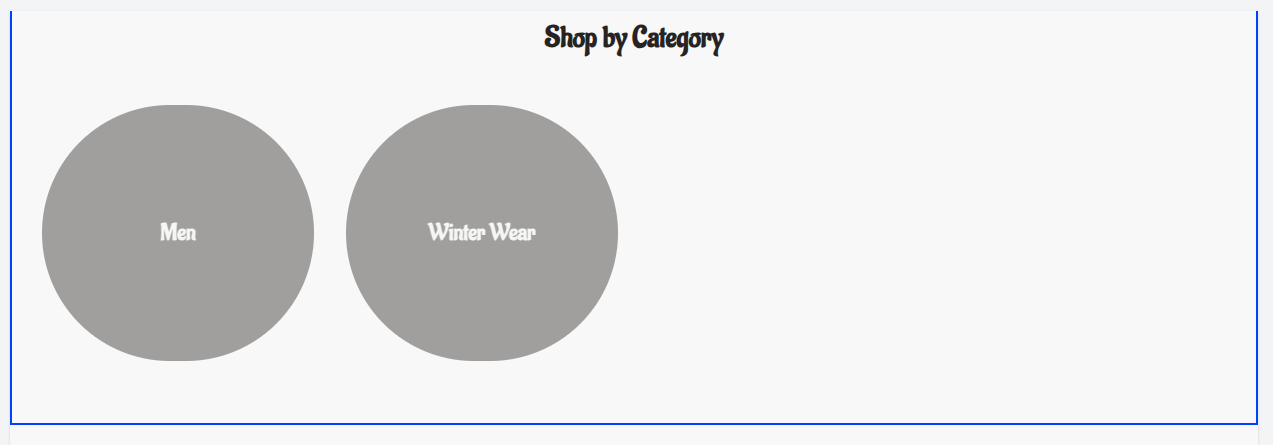
2) Category List
Showcases particular product categories for easy access by users.
Category List Setting
Select Category List under the Template Section.
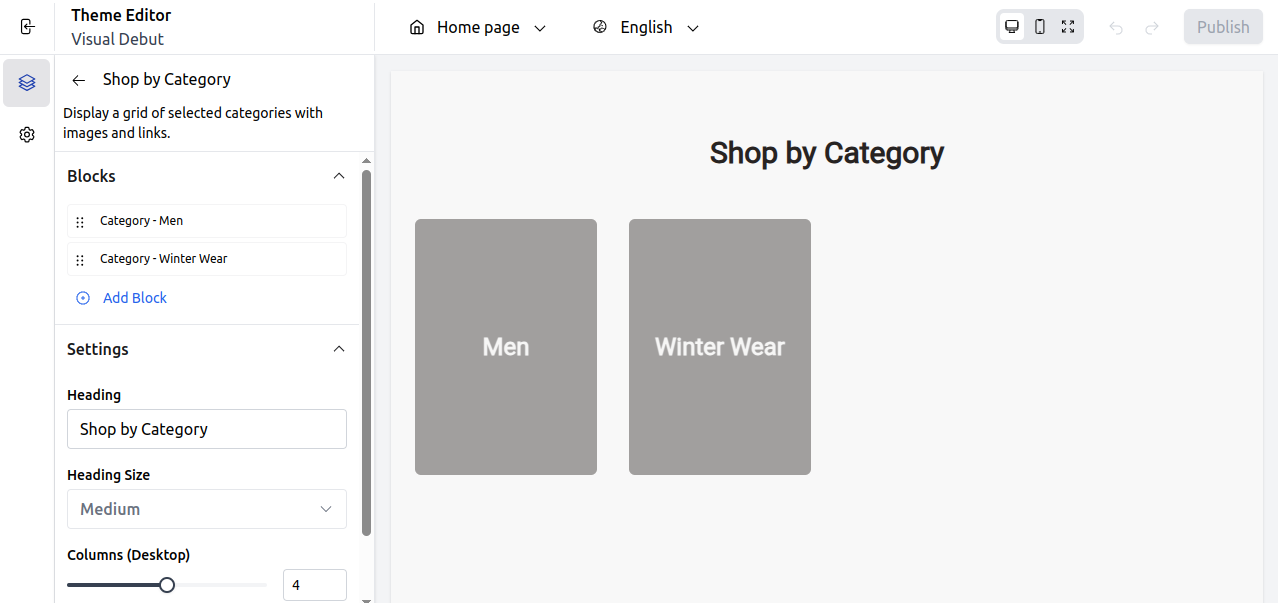
- Category Men / Winter Wear: Separate category sections with pictures and links.
- Add Block: Include additional category sections to the grid.
- Heading: Title text for this part (like “Shop by Category”).
- Heading Size: Changes the size of the heading text.
- Columns (Desktop): Determines how many category columns appear on desktop.
- Columns (Mobile): Determines how many category columns appear on mobile.
At last, publish the changes.
Front End
The Category List will be visible on the front end, as given below.
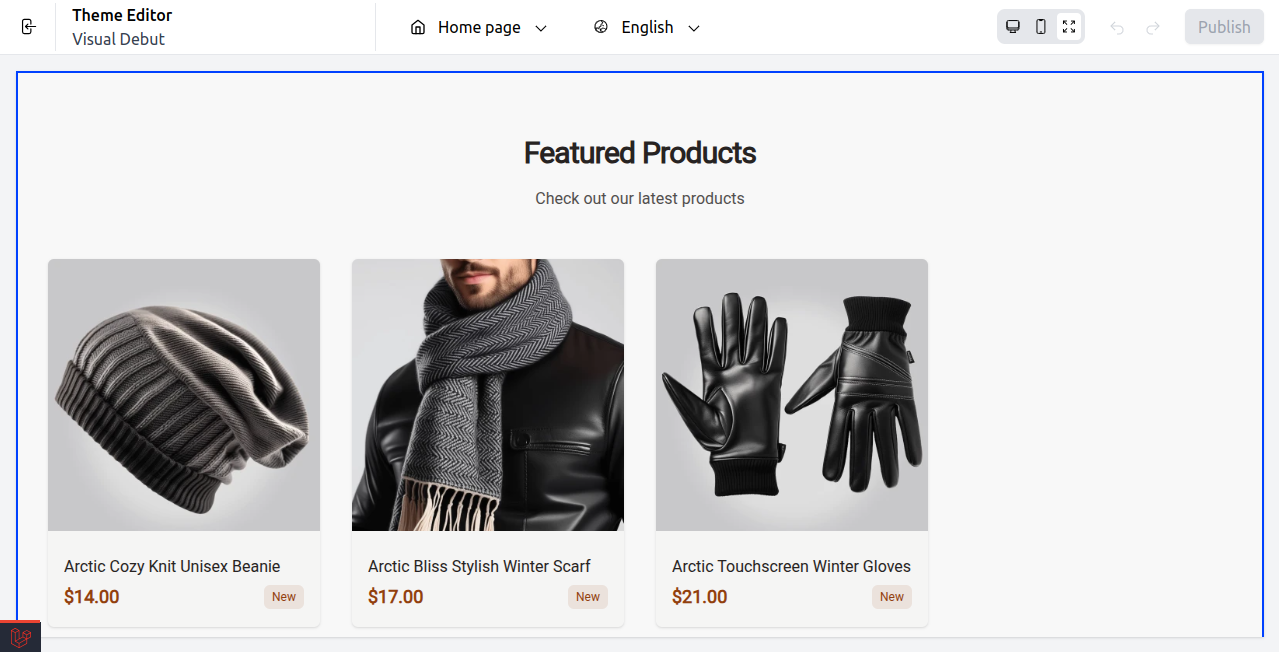
3) Featured Products
Shows the best or selected products to increase visibility and sales.
Featured Products Setting
Select Featured Products under the Template Section.
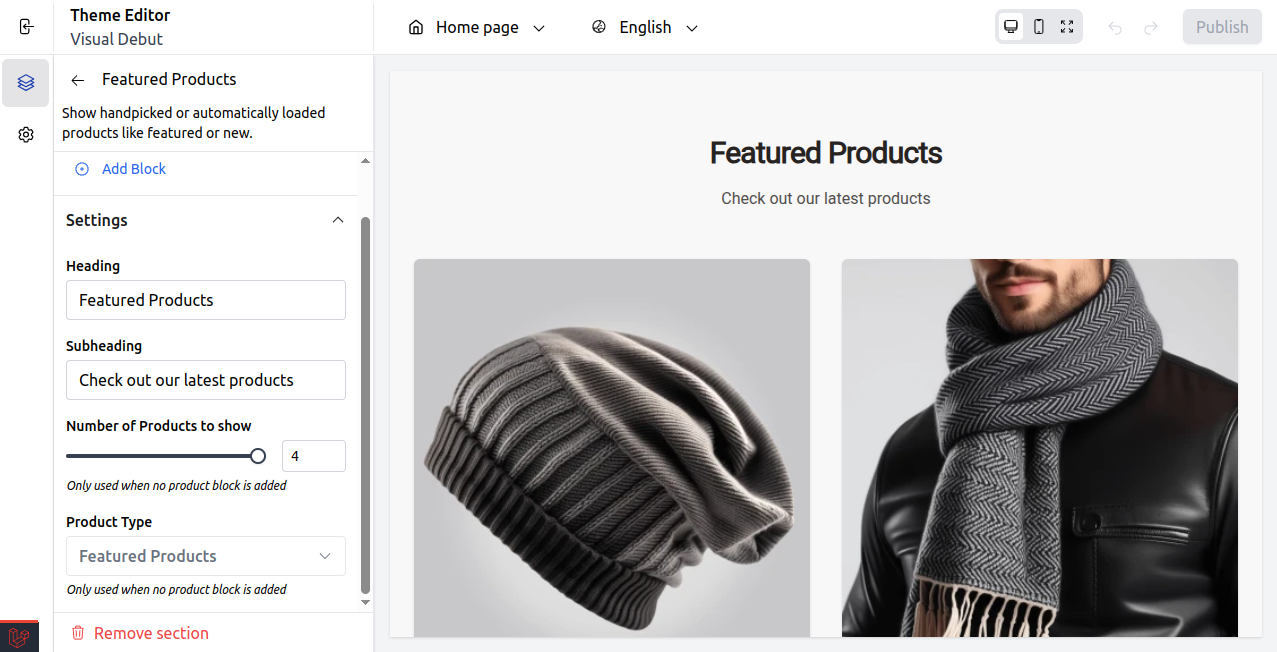
- Add Block: Manually include specific product blocks.
- Heading: This is the title for the section (like “Featured Products”).
- Subheading: Extra text that goes under the heading (for example, “Check out our latest products”).
- Number of Products to show: This sets how many products will be displayed if no blocks are added.
- Product Type: Automatically picks the product category (like Featured) if no manual blocks are included.
At last, publish the changes.
Front End
The Featured Products will be visible as given below on the front end.
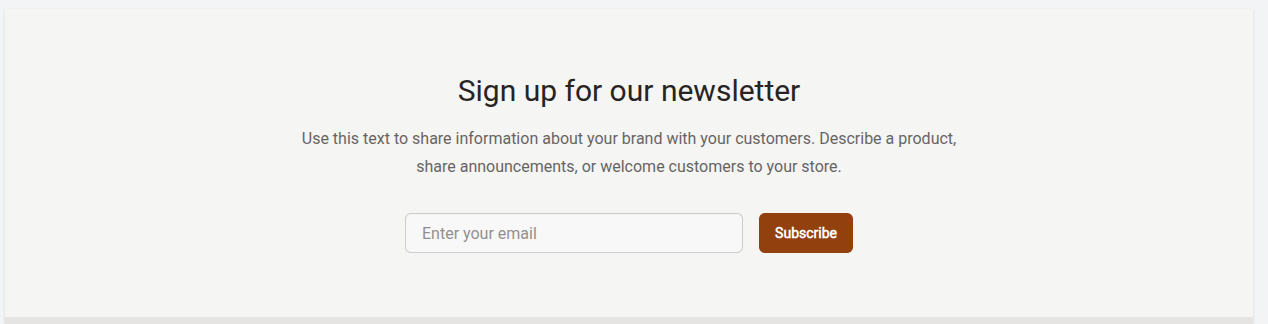
4) Newsletter Signup
Let customers join your email list to receive news and special offers.
Newsletter Signup Setting
Select Newsletter Signup under the Template Section.
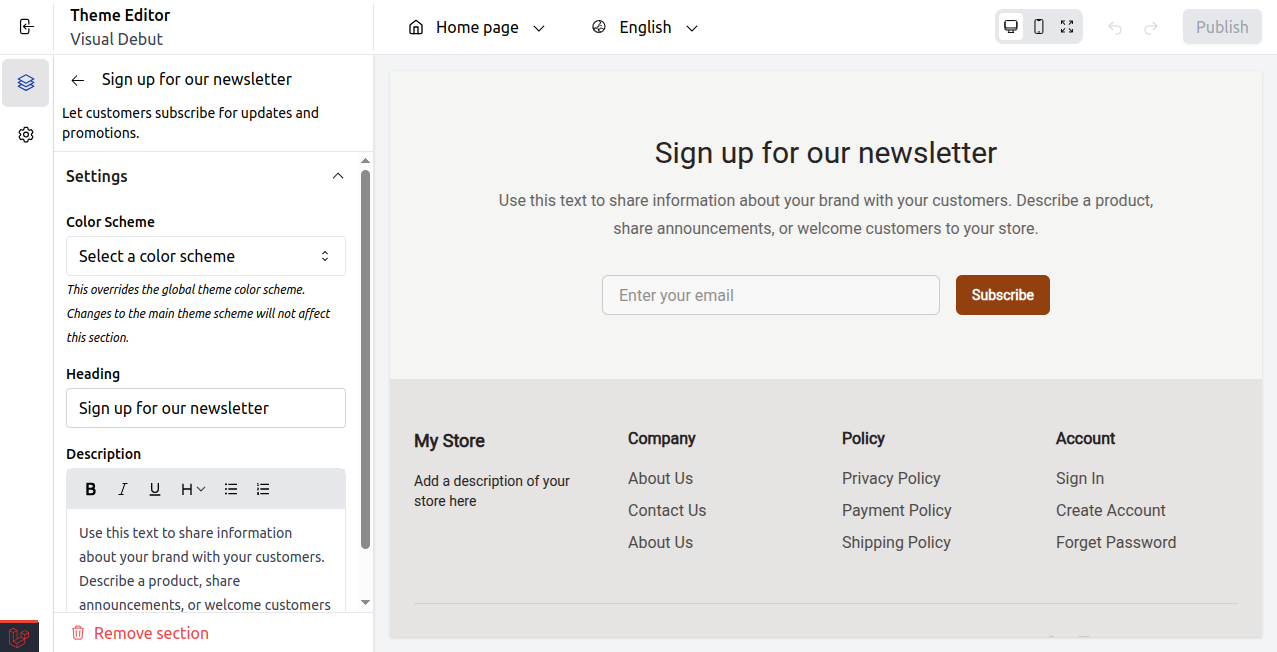
- Color Scheme: Changes the usual theme colors for this part.
- Heading: The main title that appears in the newsletter section.
- Description: A message that supports or introduces the brand, shown right under the heading.
At last, publish the changes.
Front End
The Newsletter Signup will be visible as given below on the front end.
Remember: You can include several extra sections using the “Add Section” option.
These sections can be Collage, Contact Form, Feature Icons, or Text with Image blocks. Feel free to adjust them to match your store’s design and objectives.
Layout Footer Sections
Include key links, store information, and social media icons in the footer section.
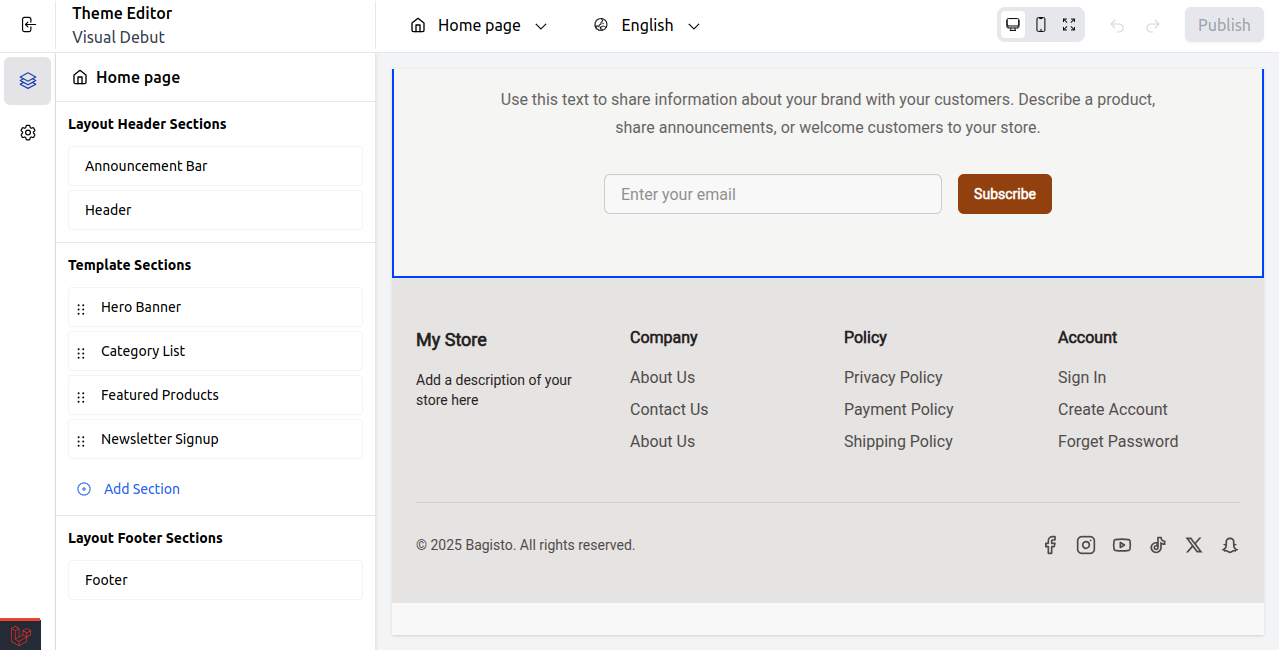
1) Footer
The footer is the part at the bottom of your store. It shows important links, contact information, icons, and store policies so customers can find them easily.
Footer Setting
Select Footer under the Layout Footer Section.
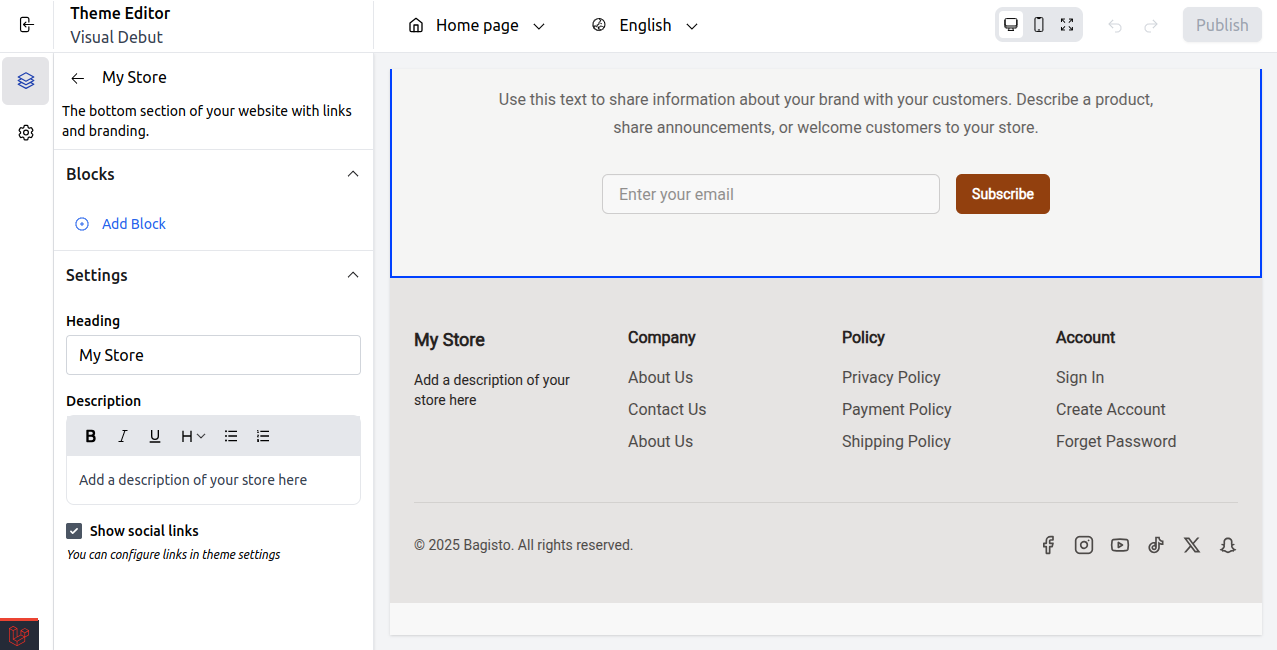
- Blocks / Add Block: This feature allows you to add more content blocks, such as text or links, into the footer.
- Heading: Title text displayed in the footer section.
- Description: A brief message or store summary is shown below the heading.
- Show social links: Toggle to display or hide social media icons.
At last, publish the changes.
Front End
The Footer Section will be visible on the front end, as given below.
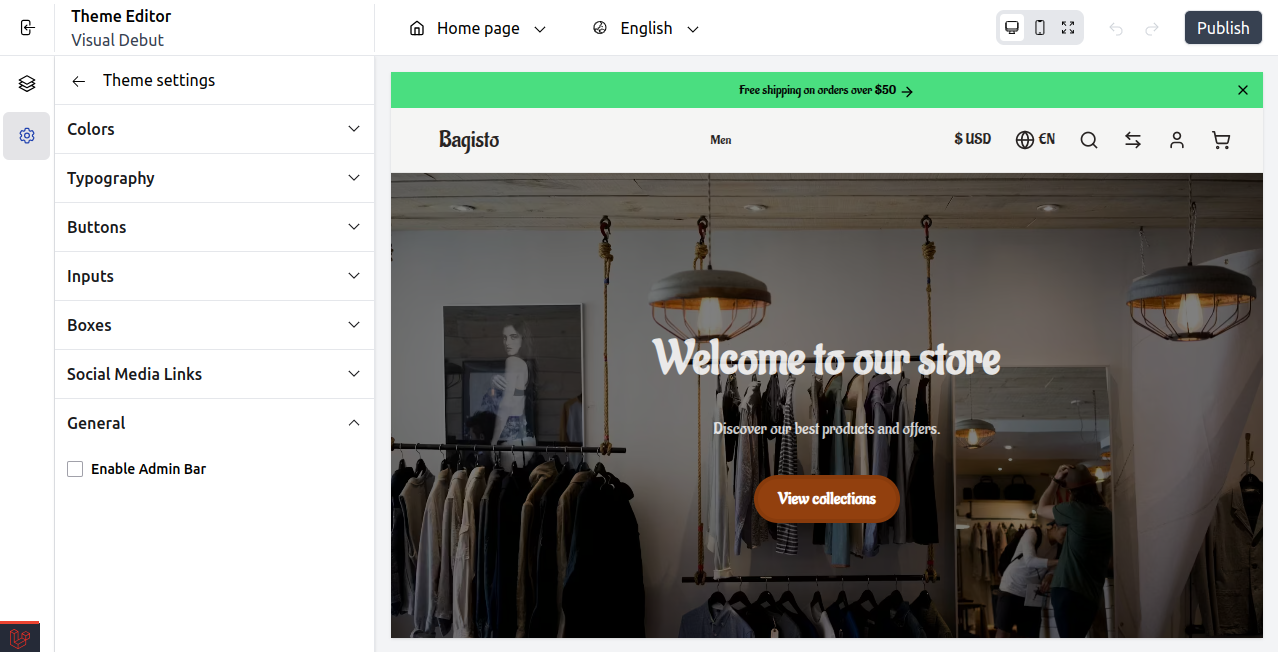
Available Theme Settings:
1) Colors
Change the color styles throughout your store.
Set Colors in Bagisto Visual.
Here we have explained the steps to set colors in the visual editor.
Step: On the Admin panel of Bagisto, go to Bagisto Visual →Themes→Custoimize→Settings→Colors as shown below.
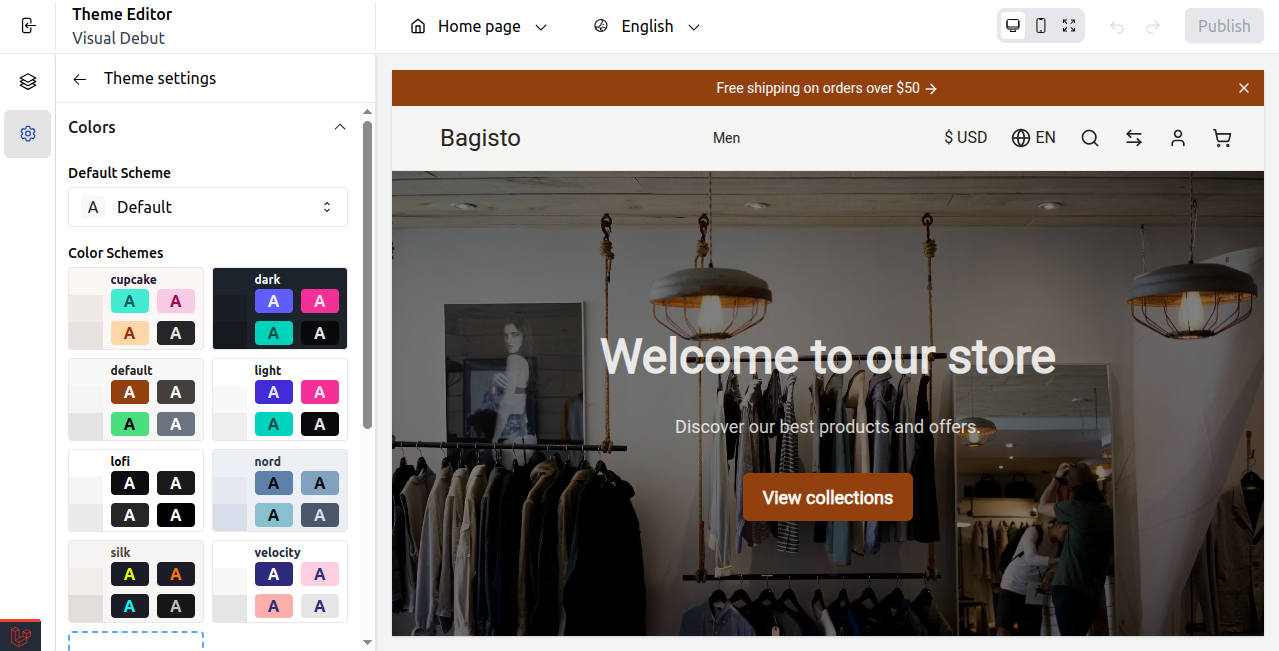
With this, you can easily change color schemes and style your store to match your brand identity.
At last, publish the changes.
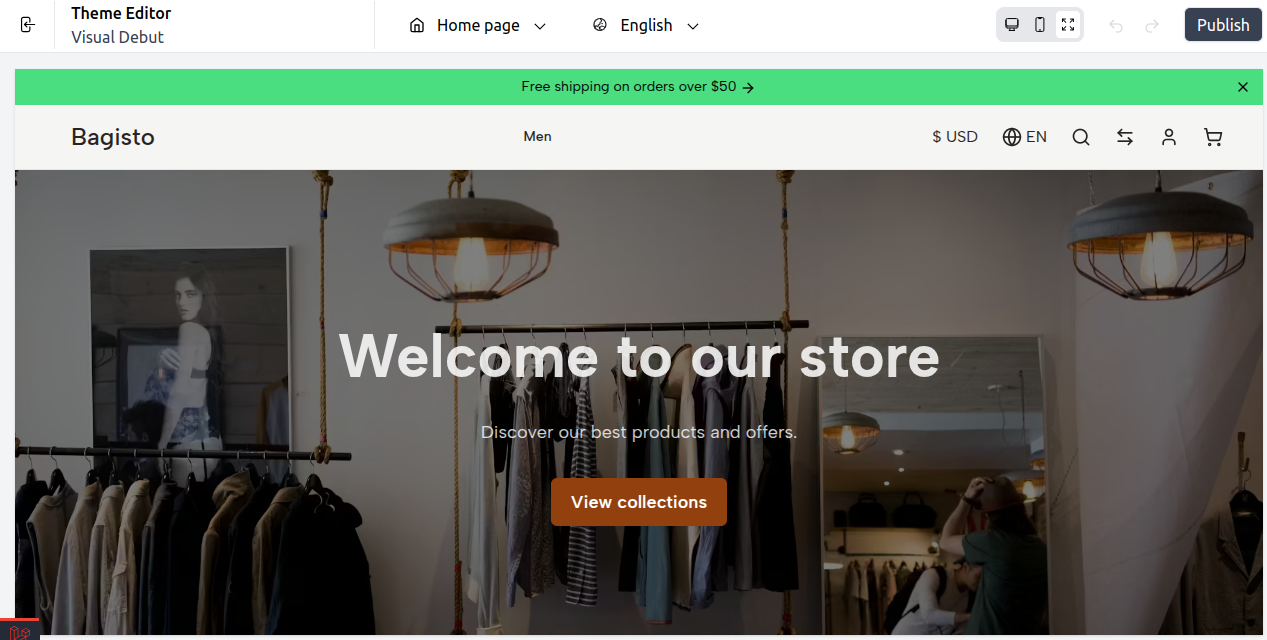
Front End
After changing the color under Theme Settings, your storefronts will appear on the front end, as shown below.
2) Typography
Choose the fonts, sizes, and how the text looks.
Set Typography in Bagisto Visual.
Here we have explained the steps to set typography for your store.
Step: On the Admin panel of Bagisto, go to Bagisto Visual →Themes→Custoimize→Settings→Typography as shown below.
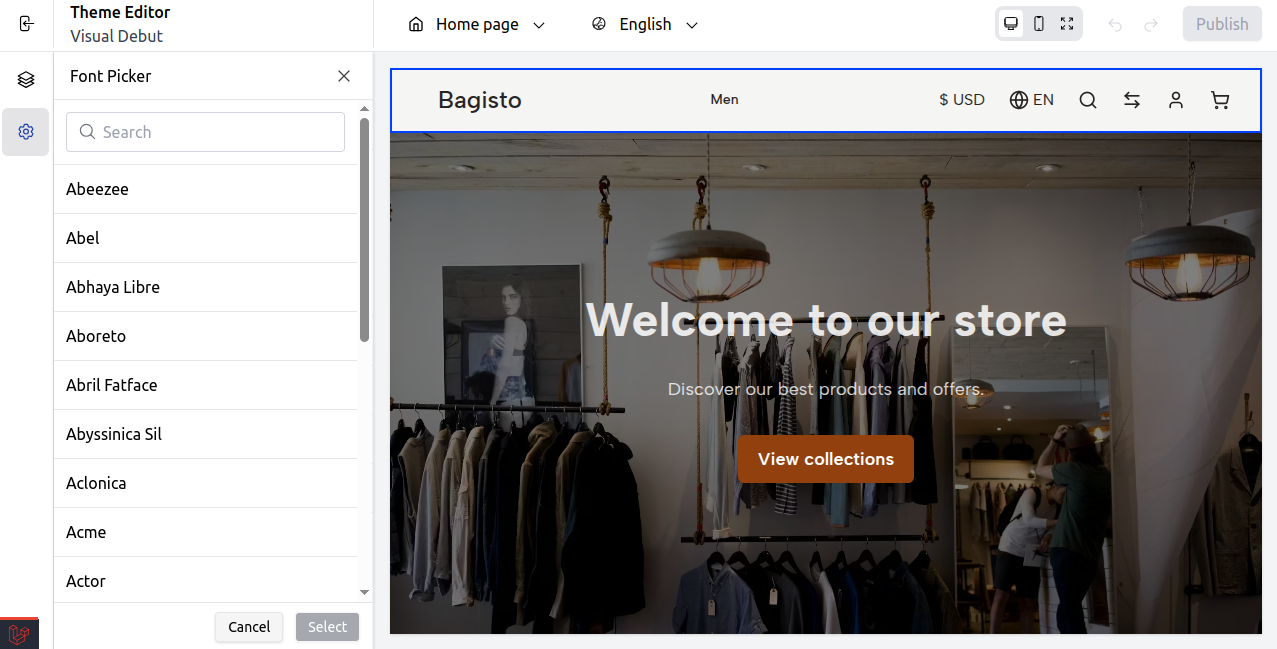
With this, you can easily choose your preferred fonts and adjust the typography to match your store’s style and improve readability.
At last, publish the changes.
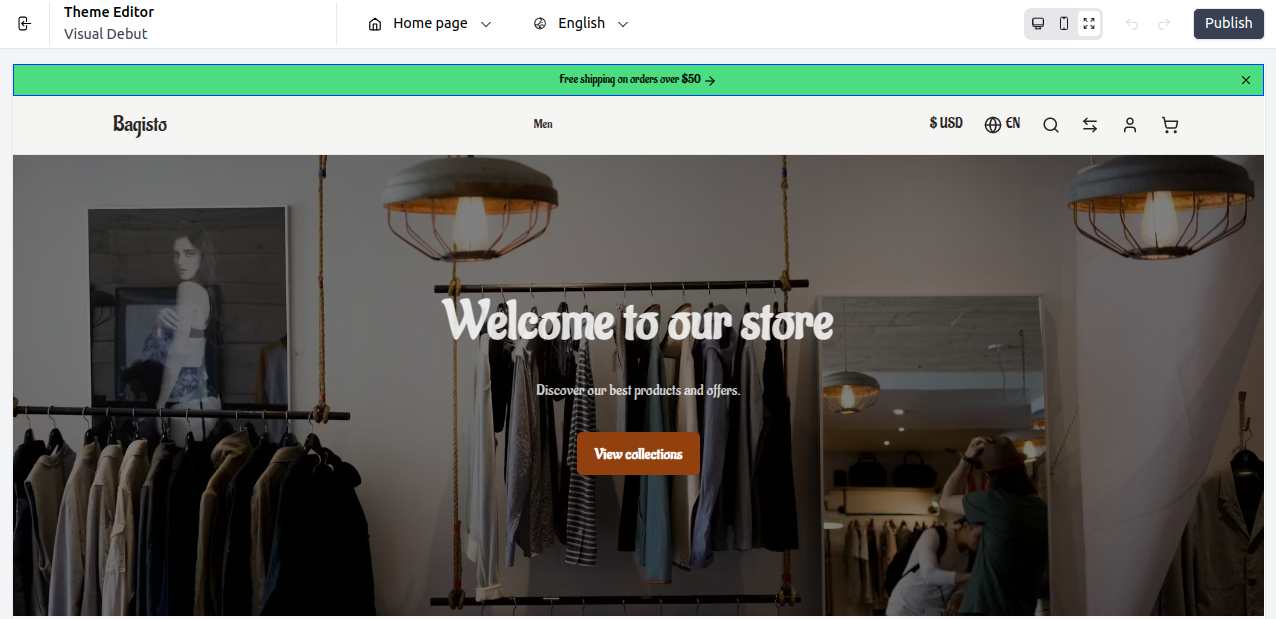
Front End
After changing the typography under Theme Settings, your storefronts will appear on the front end, as shown below.
3) Buttons
Design the shapes, borders, and effects when you hover over buttons.
Set Buttons in Bagisto Visual.
Here we have outlined the steps to customize buttons using the visual editor.
Step: On the Admin panel of Bagisto, go to Bagisto Visual →Themes→Custoimize→Settings→Buttons as shown below.
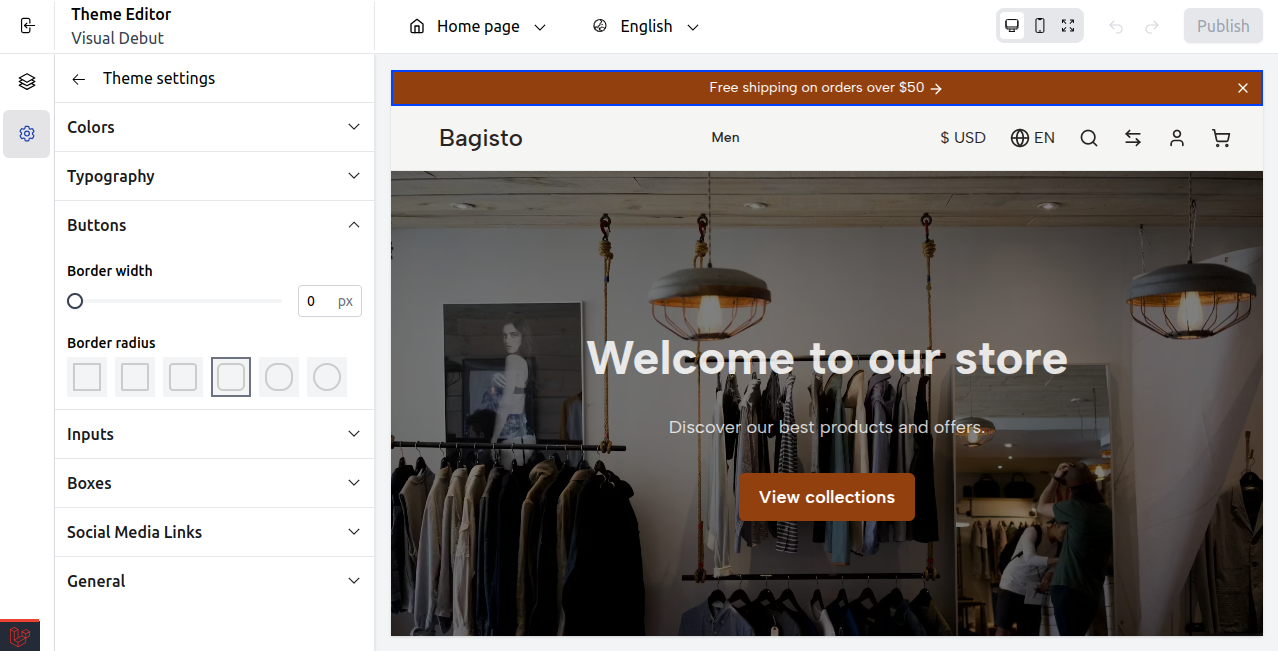
With this, you can easily adjust button width and border radius to match your store’s style and improve the user experience.
At last, publish the changes.
Front End
After adjusting the button radius and border under Theme Settings, your storefront’s buttons will appear on the front end as shown below.

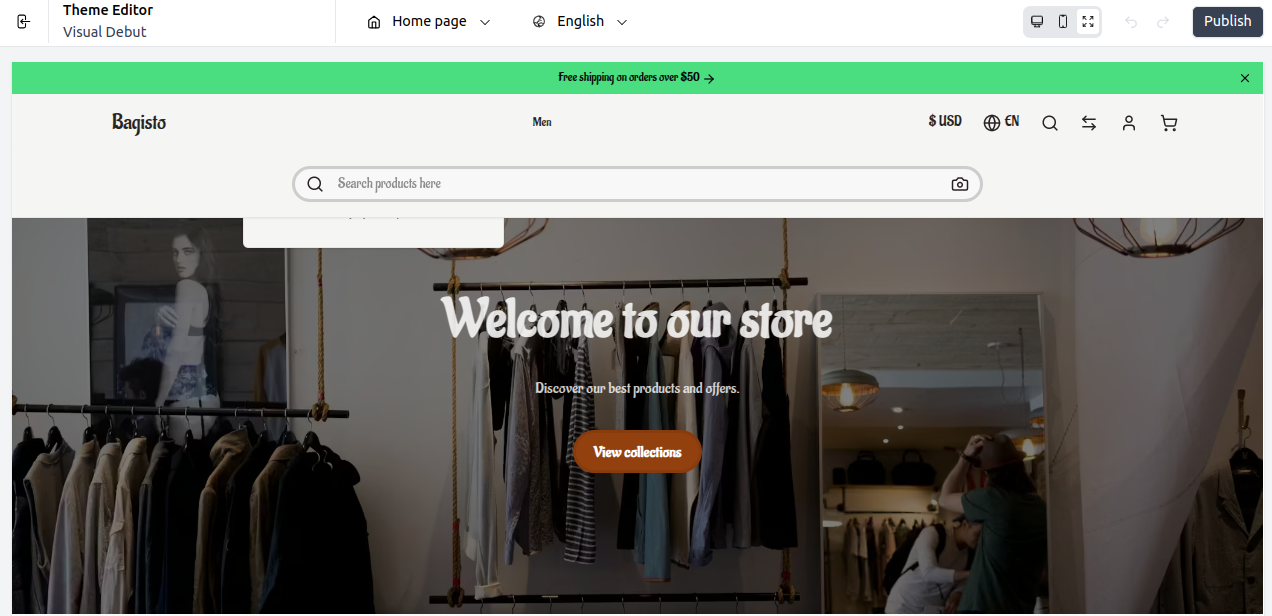
4) Inputs
You can change how input fields look by adjusting things like their height, border thickness, and how rounded their corners are.
Set the Input fields in Bagisto Visual.
Here we have explained the steps to customize input fields, such as their style and spacing, using the visual editor.
Step: On the Admin panel of Bagisto, go to Bagisto Visual →Themes→Custoimize→Settings→Inputs as shown below.
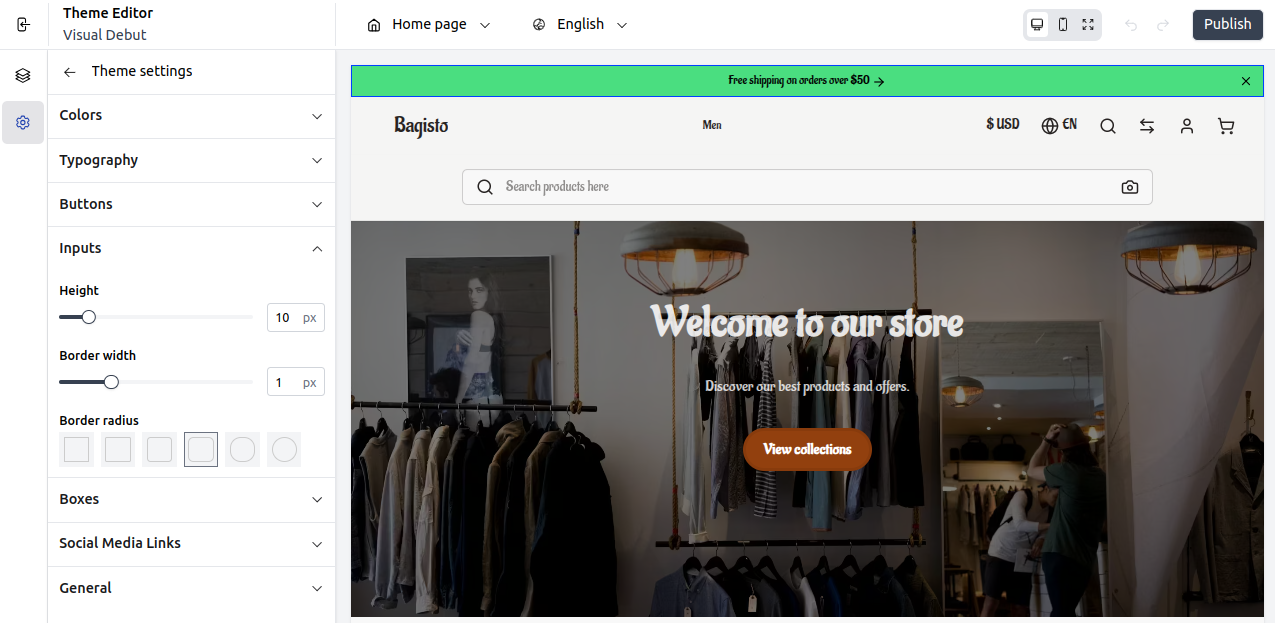
With this, you can easily customize the height, border width, and border radius of input fields to align with your store’s design and enhance form usability.
At last, publish the changes.
Front End
After updating the input field height, border, and radius in Theme Settings, fields will appear like this on the storefront.
5) Boxes
In the Boxes tab, you can change the border width and radius to personalize the card designs and spacing.
Set the Boxes in Bagisto Visual.
Here we have explained steps to set up Boxes in Visual.
Step: On the Admin panel of Bagisto, go to Bagisto Visual →Themes→Custoimize→Settings→Boxes as shown below.
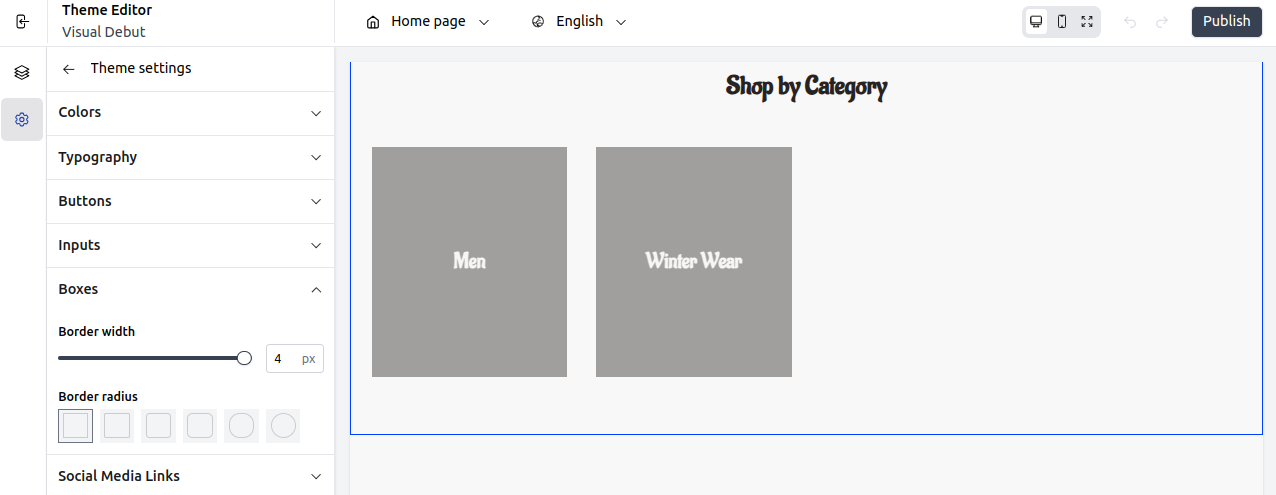
With this, you can easily adjust the box border width and radius to align with your store’s overall design and layout.
At last, publish the changes.
Front End
After updating box border width and radius in Theme Settings, box elements will appear like this on the storefront.
6) Social Media Links
Add or update links for platforms like Facebook, Instagram, YouTube, TikTok, X (Twitter), and Snapchat under the Social Media Links tab.
Set the Social Media Links in Bagisto Visual.
Here we have explained steps to set up social media links in Visual.
Step: On the Admin panel of Bagisto, go to Bagisto Visual →Themes→Custoimize→Settings→Social Media Links as shown below.
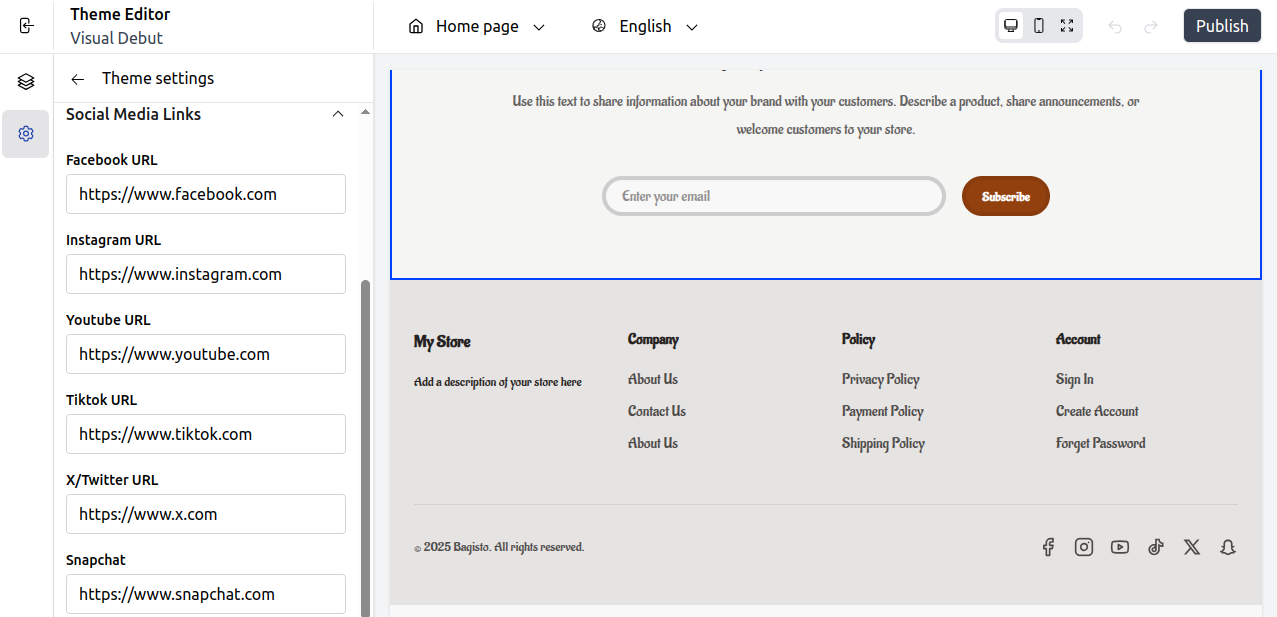
Using this, you can quickly add or update social media links to connect your store with popular platforms and enhance your brand’s presence.
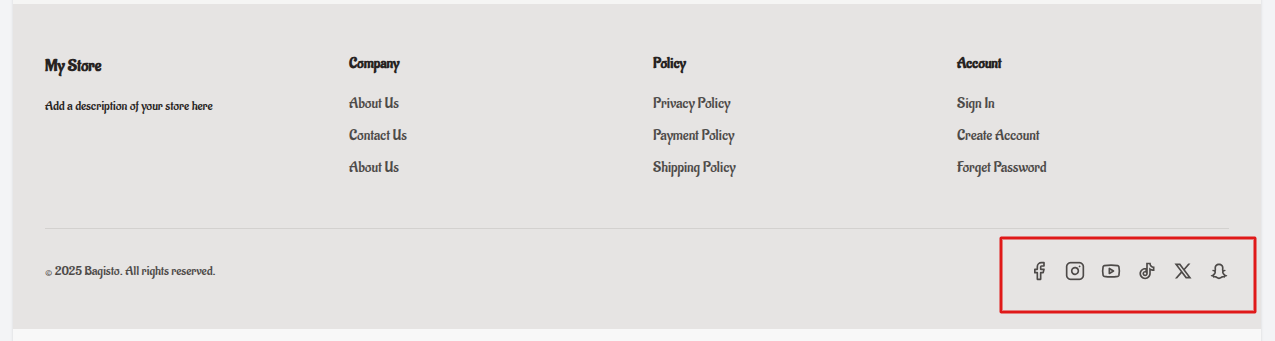
At last, publish the changes.
Front End
After adding your social media URLs under Theme Settings, the social icons will appear on the storefront as shown below.
7) General
Enable or disable the admin bar across your site using the General tab under Theme Settings.
Enable Admin Bar in Bagisto Visual.
Here we have explained steps to enable the admin bar in Visual.
Step: On the Admin panel of Bagisto, go to Bagisto Visual →Themes→Custoimize→Settings→General as shown below.
With this, you can quickly toggle the admin bar to customize the backend view and simplify store management.
At last, publish the changes.
Front End
Once you turn on the Admin Bar in the Theme Settings, it will show up on the storefront so you can easily access the backend, as seen below.

Language Selector
Allow users to switch languages easily, improving accessibility for global customers.
Set the Language Selector in Bagisto Visual
Here we have explained the steps to configure the Language Selector.
Step: On the Admin panel of Bagisto, go to Bagisto Visual →Themes→Custoimize→Header.
Scroll to the Language Selector option.
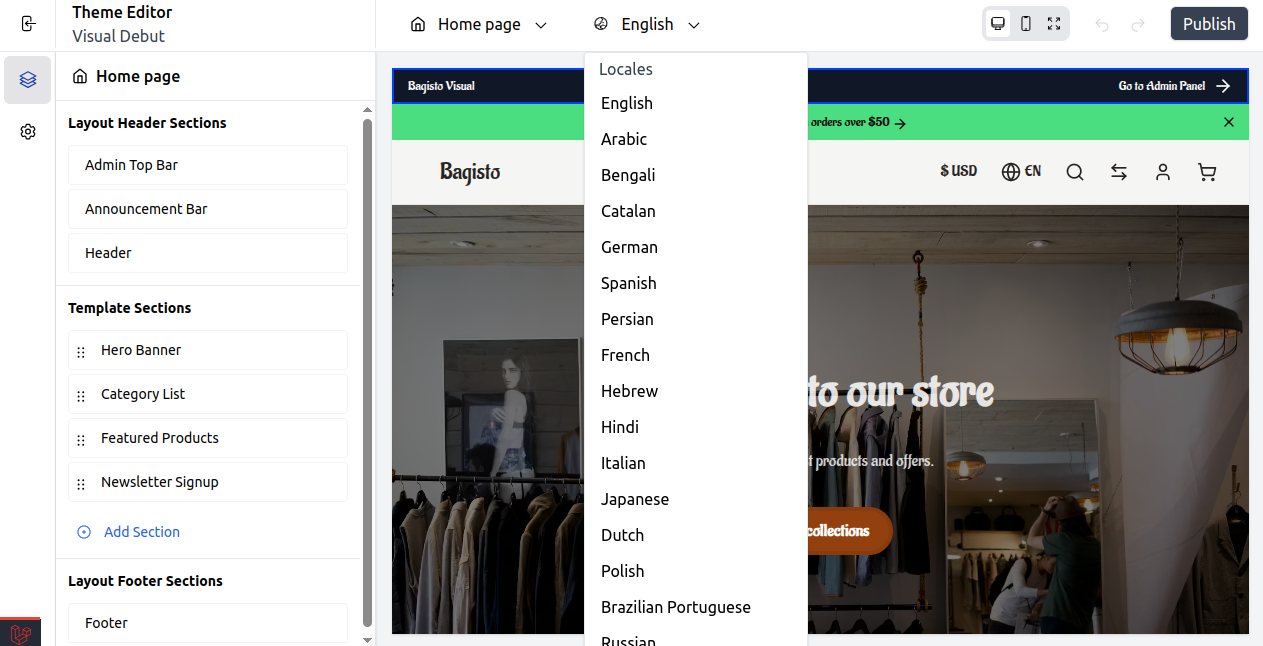
With this feature, users can switch between multiple languages, making it easy to browse your store in their preferred language.
At last, publish the changes.
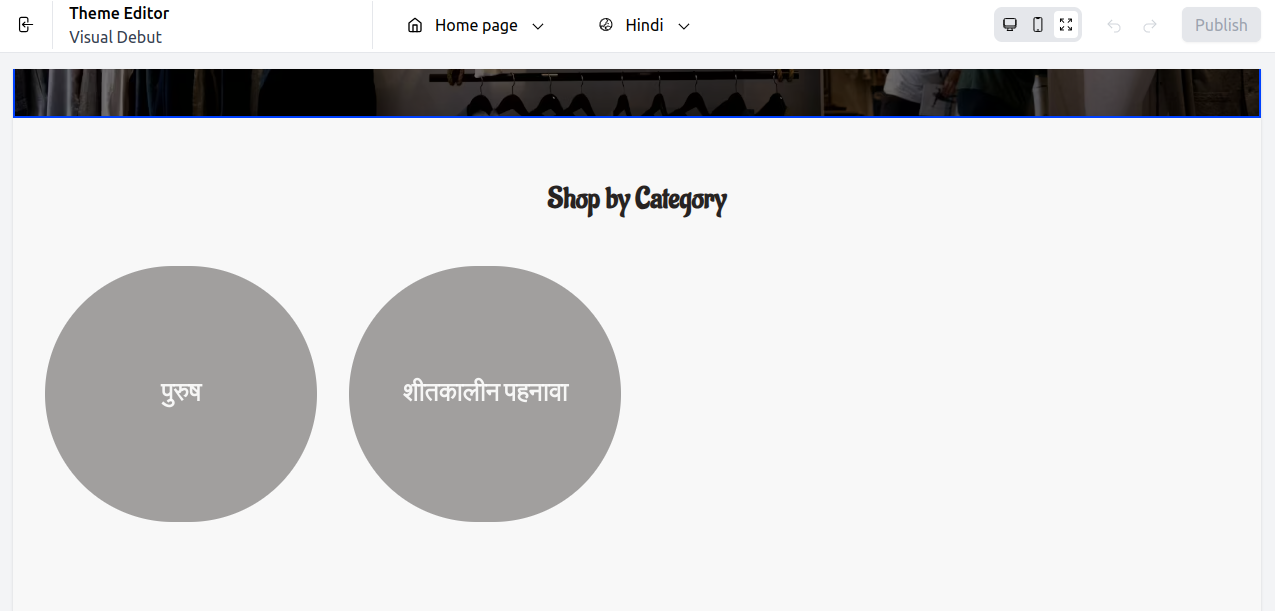
Front End
When you select a different language, your store updates automatically.
Assign the Visual Theme to Your Channel
Set the Visual theme (e.g., Visual Debut) as the active theme in your channel settings to apply changes from the Visual Editor to the live storefront.
Set the Default Channel to Use the Visual Theme
Step: On the Admin panel go to Settings → Channels → Edit (your current channel)
Under the Design section, set the “Theme” to Visual Debut as shown below.
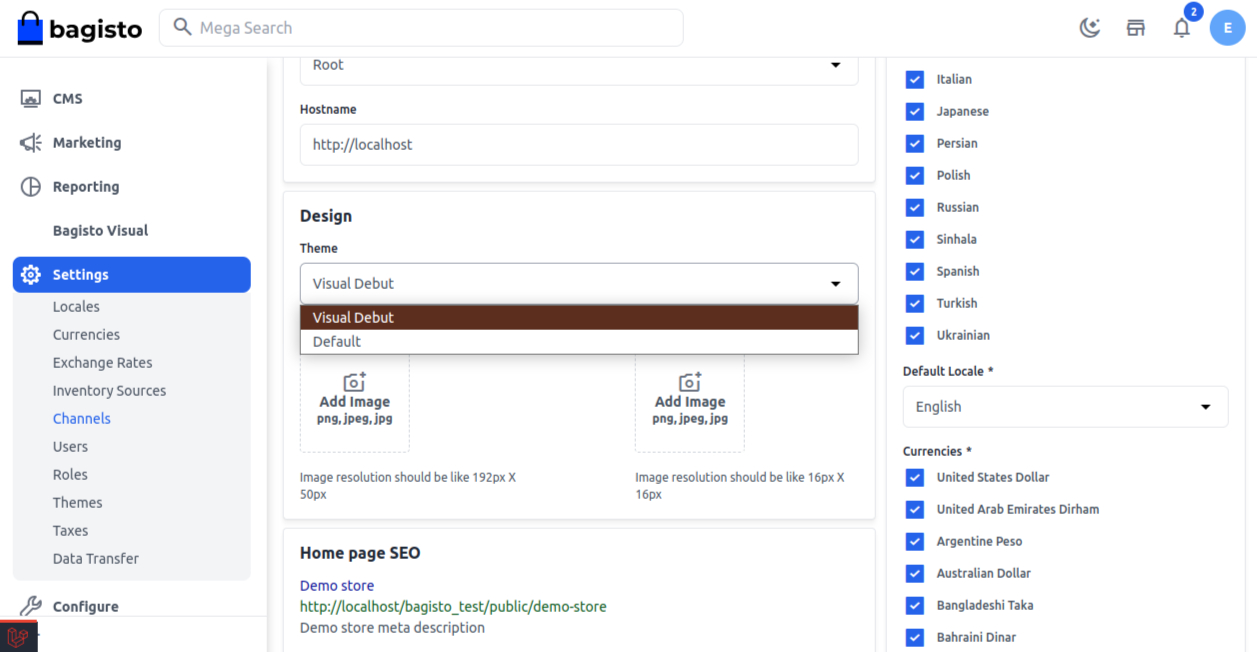
Select Visual Debut as the theme and save changes to apply it live.
At last, save the changes.
Front End
Once you make the changes in Theme Settings, the default store will show the new design like the one below.

Support
So, that was everything you needed to get started with the Bagisto Visual Theme Editor.
If you have any questions or need further help, feel free to contact our support team.
You can also raise a ticket through our HelpDesk System for any support related to Bagisto Visual.
Looking to enhance or customize your Bagisto storefront even further?
Explore our Laravel services and Bagisto extensions to improve your eCommerce store.
Current Product Version v2.0.0 alpha.4
Supported Framework Version Bagisto 2.3+


I checked documentation doesn’t say anywhere how to switch website theme to this new theme.
I did some small edits and clicked Publish in Visual Editor but still the same, only published the edits to the Preview.
Went to Settings/Themes and switched all of the sections to Visual Debut but its it just made disapear the sections from old theme the new theme doesn’t show.