In this article, we will explore How to build a laravel eCommerce website using Next.js
Next.js is a strong framework based on React that allows for Static Site Generation (SSG).
And, Server-Side Rendering (SSR), making it perfect for creating fast and SEO-friendly eCommerce sites.
It can be easily launched on platforms like Vercel or Netlify, which help to lower latency through global CDN delivery.
Modern JavaScript frameworks speed up development by providing instant previews in the browser.
However, if large JavaScript codebases are not organized well, they can become hard to manage over time.
Performance and Core Web Vitals can also be influenced by minor changes in implementation.
While SSR can enhance initial load times and SEO, it might raise infrastructure costs if not properly optimized.
Next.js – Kicks the traditional eCommerce Platforms
Your website/app would be SEO-friendly as the features of Next.js like server-side rendering and static exporting guarantee it.
And this is the most important thing to any eCommerce business.

Next.js supports two forms of pre-rendering: Static Generation and Server-side Rendering. The main difference in both of them generates when comes to HTML.
Server-Side Rendering:
In Server-Side Rendering (SSR), when someone asks for a webpage, the server takes care of the request.
And creates a complete HTML page by getting the necessary data from the database.
This HTML is then sent back to the user’s browser over the Internet.
After the browser gets the HTML, it quickly reads the content and shows the webpage to the user.
The whole process includes getting the data, making the HTML, and sending the response.
This happens in just milliseconds, making the initial page load faster and giving a better experience to the user.
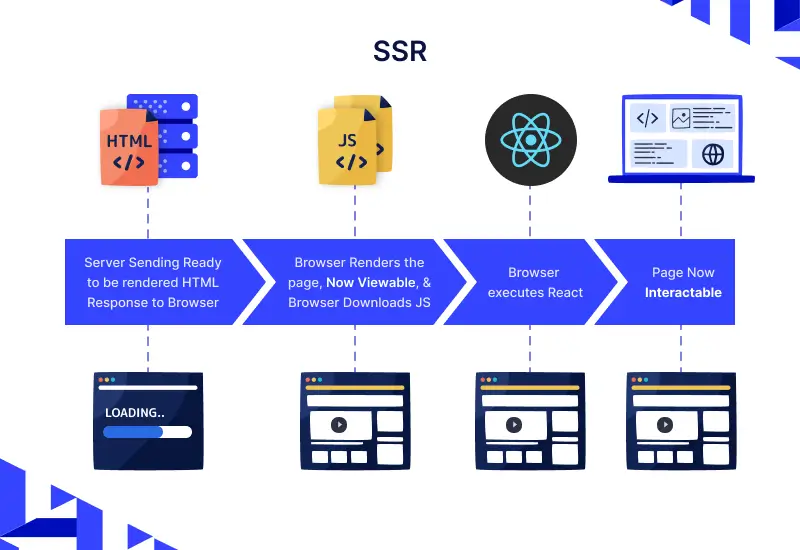
The entire process will be repeated by the server if the user clicks on any random link on the page.
Now Imagine that a user clicks a link on the page. It will not only increase the load on the server but also uses internet bandwidth.
Client-Side Rendering:
A new approach for rendering websites was introduced known as Client-side rendering.
And it wasn’t popular till JavaScript libraries started working with it.
The content gets rendered in the browser using JavaScript.
Instead of having the content from an HTML document, it can be in a JavaScript file.
In the initial loading, all the sites can render the rest of the site using the browser.
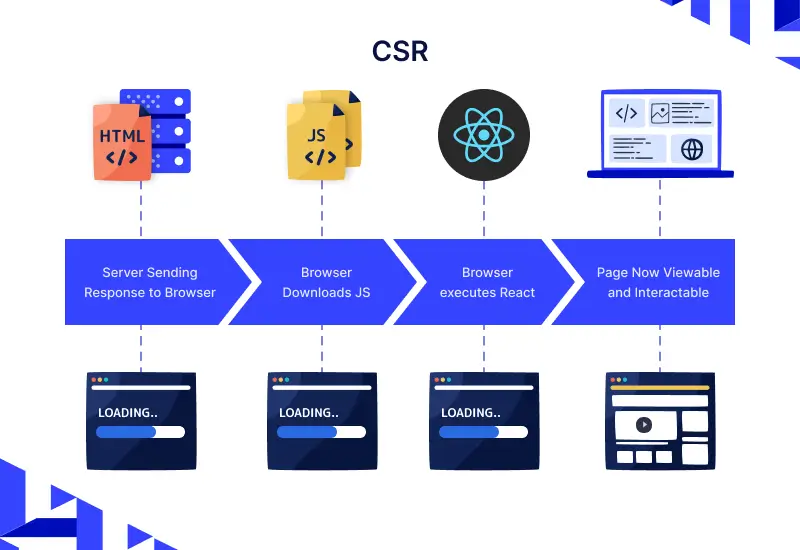
But in CSR, the initial page loads a bit slow but after that every other page load is fast.
There is no need to call the entire UI after every contact with the server.
By just re-rendering that particular DOM element, It manages to update the UI with changed data.
React.js is the best example of libraries used in client-side rendering.
Here are some of the pros and cons of both the SSR and CSR-
Server Side Pros-
- Better SEO.
- Initial Page loading is faster.
- Good for Static sites.
Cons:
- Due to SSR, there are frequent server requests.
- Gives slow page rendering.
- Non-rich site interactions.
Client-side pros:
- It has Rich site interactions
- After the initial load fast website rendering.
- Web applications are great with it.
- Robust selection of JavaScript libraries.
Cons:
- If it is not implemented in the right way then Low SEO will occur.
- In the initial loading, it requires more time.
- An external library is required in most the cases
Steps to build eCommerce with Next.js
Let’s move to the steps to build an eCommerce website using Next.js.
1. Setting up the development environment
For starting we first need to set up our environment also after that we can start building the website-
Write the command in the Terminal:
|
1 |
npx create-next-app |
A pop-up will also come to let you enter your project’s name.
After it, all the project dependencies and files and folders will be installed and created for you.
|
1 |
Then, run <b>npm run dev</b> |
Now check at localhost:3000, and you can see your app.
2. Defining a Layout
After creating the environment, now let’s move to the layout for the store.
Which will include a Header and also a Footer with links to the cart and contact information.
The layout can be added to the app’s main entry point. The entry point is located at
|
1 |
<b>pages/_app.tsx</b> |
in the Next.js.
You can clearly witness that the MyApp function is returning the pageProps.
The function can also be used to create the app’s layout.
Now it’s time to create components. We can also create a components directory at the project’s root.
-
Creating components
Let’s start creating the components we need. Going into the components directory, create a
|
1 |
<b>Header.tsx</b> file. |
We can easily convert the HTML elements into in-website links through the Link component from Next.js. Now, in the same manner, create a
|
1 |
<b>Footer.tsx</b> file. |
- Integrating components
The components which we have created till now, we have to add to our app. Now we’ll create a Layout component with a Header and Footer in it.
After the creation of layout components, the next step is to add them to the
|
1 |
<b>_app.tsx</b> file. |
Now run the app’s dev mode and see the localhost page, you can view your app’s layout created.
- Customizing your homepage
We will create a few more components to keep things maintained as we also need to display both information about our store and also the products we will sell.
3. Creating required components
Now after defining layouts, you need to create the required components for your eCommerce store.
-
The product component
As we’re building an eCommerce website we will need a Product component to show on the homepage.
Whatever information you need to display on the product, the component will output. You have to add this particular component, underneath the interface.
-
A note on the Image Component
Instead of using the former img tag, we can also use Next.js’s Image Component .
This results in many positive things like automatic image optimization, by default lazy loading.
And showing images in WebP format when the browser allows it, which optimizes images to the client device.
4. Pre-rendering data and importing components
Every page is pre-rendered in Next.js. This means in simple words that Next.js generates HTML for all the pages.
This feature can also result in better performance and SEO.
Two forms of pre-rendering for Next.js.
- Static Generation (Recommended): By exporting getStaticProps, at build time only the HTML will be generated and will be reused on each request. It can also be used with Client-side Rendering to bring in additional data.
- Server-side Rendering: Here the HTML will be generated on each request. By exporting getServerSideProps, a page can also use Server-side Rendering.
5. Product validation
Now after all the product listing, rendering, and creating components, the last step comes the product validation.
- HTML validation
The very first method to perform it is by changing the URL in your product list to / for every product to the homepage for HTML validation.
It will also read the / on the homepage and crawl it in order to validate the products if you want.
- JSON validation using Next.js serverless API
In the more complicated scenarios, it is good to use an API returning the products information in JSON format.
For doing it also, we need to have a unique URL for each product which will return its information in a JSON file.
We can have this validation also in two ways-
Configuring static API routes
Configuring dynamic API routes
6. Styling your Next.js
Mostly all the components also have their classnames in this article now we will look at 2 different ways to apply them:
-
Setting up a global stylesheet
Create a global.scss style sheet in the style folder. Afterward,
|
1 2 3 4 5 |
simply import it to <b>pages/_app.tsx:</b> // in pages/_app.tsx import "../styles/globals.scss"; |
Global stylesheets can only be imported into the _app.tsx file.
- Setting up CSS modules for your components
If your CSS file gets larger, it can also become quite handy.
The syntax for using it is-
|
1 |
<b>[name].module.css convention, </b> |
As a style object in the component’s file, you can import it and access the styles with it.
And now!!! You’re ready to go with your Next.js website!
Conclusion
Back-end-oriented architecture to next.js is something beyond expectations for all the techies.
In it, there is also so much to learn that the team members also feel outside of their comfort zone.
Also, the development with Next.js gives an amazing experience and productivity boost.
So, that was much about “How to build a laravel eCommerce website using Next.js?”
For any queries or doubts reach out to us at [email protected]. You can also raise a ticket at our HelpDesk System.


2 comments