Hello Everyone, In this Article we will learn how to create a fast and secure RESTful Authentication API with Passport Package in Laravel. But before that, we will discuss API and Laravel Passport.
API stands for Application Programming Interface. An API is a way that enables two or more software components to communicate with each other using a set of definitions and protocols. Let’s take an example of a restaurant where the waiter plays the role of middleman between the customer and the kitchen. A waiter takes orders from customers and brings those orders to the kitchen. After preparation, the waiter then brings the customers their food. so the waiter connects the customer and the kitchen. In the same way, an API is a middleman that connects two or more software platforms.
Laravel Passport is an Open Authorization 2.0 server (OAuth2) implementation used for authenticating APIs using Laravel in a matter of minutes. As the tokens are only used for API authentication, Laravel Passport provides an easy way to implement token authentication on the OAuth server.
Let’s see how to set up and configure Laravel Passport for API Authentication in a Laravel application.
Step 1: Install Laravel
Let us begin the tutorial by installing a new laravel application. if you have already installed then you may go ahead.
|
1 |
composer create-project laravel/laravel example-app |
Step 2: Add Database Detail
Go to the .env file and configure your database details. Define the database name, user name, and password of your database.
|
1 2 3 4 5 6 |
DB_CONNECTION=mysql DB_HOST=127.0.0.1 DB_PORT=3306 DB_DATABASE=database_name DB_USERNAME=root DB_PASSWORD= |
Step 3: Install Passport
In this step, we will install laravel passport package via composer. Run the following command to install the package.
|
1 |
composer require laravel/passport --with-all-dependencies |
After installation of the package, we have to use the default migration to create a new table in our database. So, run the below command.
|
1 |
php artisan migrate |
Now, we have to run the following artisan command. This command will create the encryption keys needed to generate secure access tokens.
|
1 |
php artisan passport:install |
Step 4: Passport Configuration
Now, we have to configure our model, service provider, and auth config file.
First, open the app/Models/User.php file and add HasApiTokens class as mentioned below.
|
1 2 3 4 5 6 7 8 9 10 11 12 13 14 15 16 17 18 19 20 21 22 23 24 25 26 27 28 29 30 31 32 33 34 35 36 37 38 39 40 41 42 43 44 |
<?php namespace App\Models; // use Illuminate\Contracts\Auth\MustVerifyEmail; use Illuminate\Database\Eloquent\Factories\HasFactory; use Illuminate\Foundation\Auth\User as Authenticatable; use Illuminate\Notifications\Notifiable; use Laravel\Passport\HasApiTokens; class User extends Authenticatable { use HasApiTokens, HasFactory, Notifiable; /** * The attributes that are mass assignable. * * @var array<int, string> */ protected $fillable = [ 'name', 'email', 'password', ]; /** * The attributes that should be hidden for serialization. * * @var array<int, string> */ protected $hidden = [ 'password', 'remember_token', ]; /** * The attributes that should be cast. * * @var array<string, string> */ protected $casts = [ 'email_verified_at' => 'datetime', ]; } |
Next, open app/Providers/AuthServiceProvider.php file and register the registerPolicies() method inside the boot() function, It will add the required routes.
|
1 2 3 4 5 6 7 8 9 10 11 12 13 14 15 16 17 18 19 20 21 22 23 24 25 26 27 28 29 30 31 |
<?php namespace App\Providers; use Illuminate\Foundation\Support\Providers\AuthServiceProvider as ServiceProvider; use Illuminate\Support\Facades\Gate; use Laravel\Passport\Passport; class AuthServiceProvider extends ServiceProvider { /** * The policy mappings for the application. * * @var array */ protected $policies = [ 'App\Models\Model' => 'App\Policies\ModelPolicy', ]; /** * Register any authentication / authorization services. * * @return void */ public function boot() { $this->registerPolicies(); // } } |
Now Open config/auth.php configuration file, We have to define an API authentication guard and set the driver option to Passport. This will instruct our application to use Passport TokenGuard when authenticating incoming API requests.
|
1 2 3 4 5 6 7 8 9 10 11 |
'guards' => [ 'web' => [ 'driver' => 'session', 'provider' => 'users', ], 'api' => [ 'driver' => 'passport', 'provider' => 'users', ], ], |
Step 5: Create API Routes
In this step, we will create API routes. Laravel provides an api.php file for web services routes. So, let’s add a route in the api.php file.
|
1 2 3 4 5 6 7 8 9 10 11 12 13 14 15 16 17 18 19 20 21 22 23 24 |
<?php use Illuminate\Http\Request; use Illuminate\Support\Facades\Route; use App\Http\Controllers\UserController; /* |-------------------------------------------------------------------------- | API Routes |-------------------------------------------------------------------------- | | Here is where you can register API routes for your application. These | routes are loaded by the RouteServiceProvider within a group which | is assigned the "api" middleware group. Enjoy building your API! | */ Route::post('register', [UserController::class, 'register']); Route::post('login', [UserController::class, 'login']); Route::middleware('auth:api')->group( function () { Route::get('user', [UserController::class, 'userRecord']); }); |
Step 6: Create Controller files
In this step, we have to create a new controller file as UserController. Please run the following command to create a controller.
|
1 |
php artisan make:controller UserController |
After creating the controller we will make authentication Api’s as mentioned below.
|
1 2 3 4 5 6 7 8 9 10 11 12 13 14 15 16 17 18 19 20 21 22 23 24 25 26 27 28 29 30 31 32 33 34 35 36 37 38 39 40 41 42 43 44 45 46 47 48 49 50 51 52 53 54 55 56 57 58 59 60 61 62 63 64 65 |
<?php namespace App\Http\Controllers; use Illuminate\Http\Request; use App\Models\User; class UserController extends Controller { /** * Registration Request * * @param Request $request * @return \Illuminate\Http\JsonResponse */ public function register(Request $request) { $this->validate($request, [ 'name' => 'required', 'email' => 'required|email|unique:users', 'password' => 'required|min:6', ]); $user = User::create([ 'name' => $request->name, 'email' => $request->email, 'password' => bcrypt($request->password) ]); $token = $user->createToken('bagisto')->accessToken; return response()->json(['token' => $token], 200); } /** * Login Request * * @param Request $request * @return \Illuminate\Http\JsonResponse */ public function login(Request $request) { $user = [ 'email' => $request->email, 'password' => $request->password ]; if (auth()->attempt($user)) { $token = auth()->user()->createToken('bagisto')->accessToken; return response()->json(['token' => $token], 200); } else { return response()->json(['error' => 'UnAuthorised'], 401); } } /** * Returns Authenticated User Record * * @return \Illuminate\Http\JsonResponse */ public function userRecord() { return response()->json(['user' => auth()->user()], 200); } } |
Step 7: Testing
All the required steps have been done, Now we have to test our API’s. Run the following command to serve the application on the PHP development server.
|
1 |
php artisan serve |
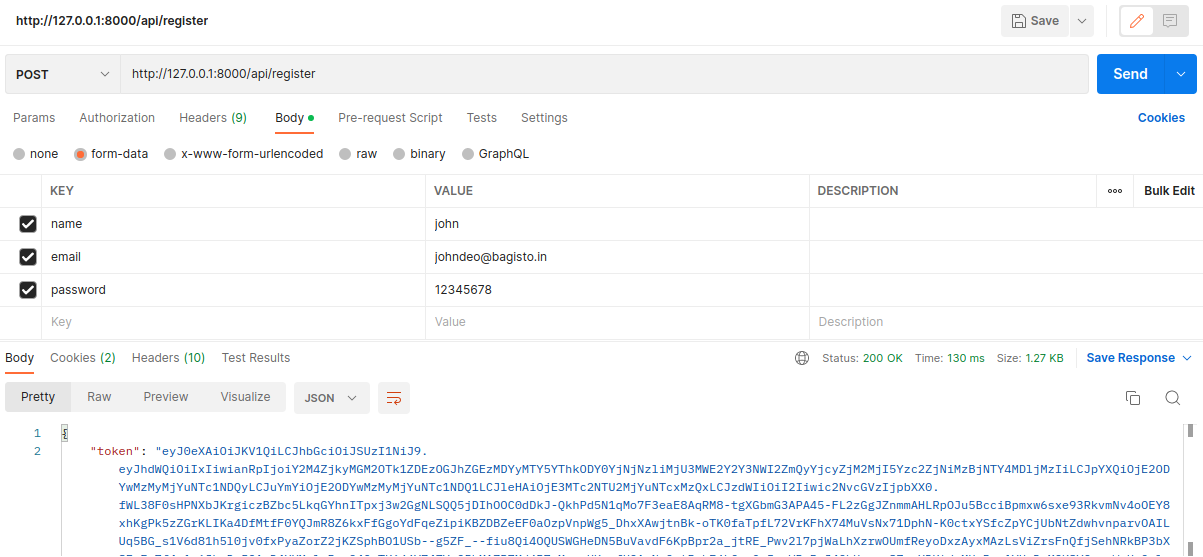
Now, let’s test our API’s endpoints using an API testing tool like Postman.
Register Api
Login Api

User Record Api
When testing user record api we have to add the following code on the header
|
1 2 3 4 |
'headers' => [ 'Accept' => 'application/json', 'Authorization' => 'Bearer '. $accessToken, ] |

I hope you will like the Tutorial and it will help you to learn API Authentication using Laravel Passport. Please comment below if you have any questions.
You can also hire laravel developers to build your custom solutions on laravel. For exploring the available extensions for Bagisto, you can check out the bagisto extension marketplace.


2 comments
Thank you for the appreciation
Team Bagisto