Hello guys, So in this article, I will show you how to authenticate to API in Laravel using Sanctum. This is very useful when you are building an API for a SPA.
This is a very simple project so follow these steps written below.
#1 Create Laravel project
- Okay, then let’s create a fresh new Laravel project.
|
1 |
composer create-project laravel/laravel --prefer-dist laravel-sanctum |
- After creating the project, install Laravel Sanctum package inside your project.
Note:- If you are using latest version of laravel then you have to simply migrate your database and start from step: #2 Make Controller and Routes. Here
|
1 |
composer require laravel/sanctum |
- Then publish the Sanctum configuration files. The Sanctum configuration file will be placed inside your config directory.
|
1 |
php artisan vendor:publish --provider="Laravel\Sanctum\SanctumServiceProvider" |
- Next, migrate your database.
Note:- Before that provide your database credentials inside your .env file.
|
1 |
php artisan migrate |
- In order to use Sanctum we need to use HasApiTokens Trait Class inside our User Model. So that we can provide the token to authenticate user with createToken() method.
So, User model should look like the image below.
|
1 2 3 4 5 6 7 8 9 10 11 12 13 14 15 16 17 18 19 20 21 22 23 24 25 26 27 28 29 30 31 32 33 34 35 36 37 38 39 40 41 42 43 |
<?php namespace App\Models; use Illuminate\Database\Eloquent\Factories\HasFactory; use Illuminate\Foundation\Auth\User as Authenticatable; use Illuminate\Notifications\Notifiable; use Laravel\Sanctum\HasApiTokens; class User extends Authenticatable { use HasApiTokens, HasFactory, Notifiable; /** * The attributes that are mass assignable. * * @var array<int, string> */ protected $fillable = [ 'name', 'email', 'password', ]; /** * The attributes that should be hidden for serialization. * * @var array<int, string> */ protected $hidden = [ 'password', 'remember_token', ]; /** * The attributes that should be cast. * * @var array<string, string> */ protected $casts = [ 'email_verified_at' => 'datetime', ]; } |
#2 Make Controller and Routes
- So first create a new controller inside App/Http/Controllers/AuthController.php.
|
1 |
php artisan make:controller AuthController |
- Update your controls as shown below
|
1 2 3 4 5 6 7 8 9 10 11 12 13 14 15 16 17 18 19 20 21 22 23 24 25 26 27 28 29 30 31 32 33 34 35 36 37 38 39 40 41 42 43 44 45 46 47 48 49 50 51 52 53 54 55 56 57 58 59 60 61 62 63 64 65 66 67 68 |
<?php namespace App\Http\Controllers; use App\Models\User; use App\Traits\ApiResponser; use Illuminate\Http\Request; use Illuminate\Support\Facades\Auth; class AuthController extends Controller { use ApiResponser; public function register(Request $request) { $request->validate([ 'name' => 'required|string|max:50', 'email' => 'required|string|email|unique:users,email', 'password' => 'required|string|min:6', 'confirm_password' => 'required_with:password|string|min:6|same:password' ]); $user = User::create([ 'name' => $request->name, 'password' => bcrypt($request->password), 'email' => $request->email ]); return $this->success([ 'token' => $user->createToken('API Token')->plainTextToken ], 'User registration successful!!'); } public function login(Request $request) { $attr = $request->validate([ 'email' => 'required|string|email|', 'password' => 'required|string|min:6' ]); if (! Auth::attempt($attr)) { return $this->error('Credentials did\'t not matched'); } return $this->success([ 'token' => auth()->user()->createToken('API Token')->plainTextToken ], 'Login successfulY'); } public function users() { $users = User::select('name', 'email')->get(); return $this->success([ 'users' => $users ], 'User list featched successfully!!'); } public function logout() { auth()->user()->tokens()->delete(); return response()->json([ 'message' => 'Logout successfully!!' ]); } } |
- Here you can notice a trait inside controller. By using this trait we can return a consistent response in a simple way and we don’t need to write same code again and again while returning response.
So, Let’s make a trait inside App/Traits/ApiResponser.php and trait look like shown below.
|
1 2 3 4 5 6 7 8 9 10 11 12 13 14 15 16 17 18 19 20 21 22 23 24 |
<?php namespace App\Traits; trait ApiResponser { protected function success($data, string $message = null) { return response()->json([ 'status' => 'Success', 'message' => $message, 'data' => $data ]); } protected function error(string $message = null, $data = null) { return response()->json([ 'status' => 'Error', 'message' => $message, 'data' => $data ]); } } |
- So, Now we have to create routes on routes/Api.php
|
1 2 3 4 5 6 7 8 9 10 11 12 13 14 15 16 17 18 19 20 21 22 23 24 25 26 |
<?php use Illuminate\Support\Facades\Route; use App\Http\Controllers\AuthController; /* |-------------------------------------------------------------------------- | API Routes |-------------------------------------------------------------------------- | | Here is where you can register API routes for your application. These | routes are loaded by the RouteServiceProvider and all of them will | be assigned to the "api" middleware group. Make something great! | */ Route::controller(AuthController::class)->group(function () { Route::post('/register', 'register'); Route::post('/login', 'login')->name('login'); }); Route::middleware(['auth:sanctum'])->group(function () { Route::controller(AuthController::class)->group(function () { Route::get('/users', 'users'); Route::get('/logout', 'logout'); }); }); |
#3 Finally Test your API
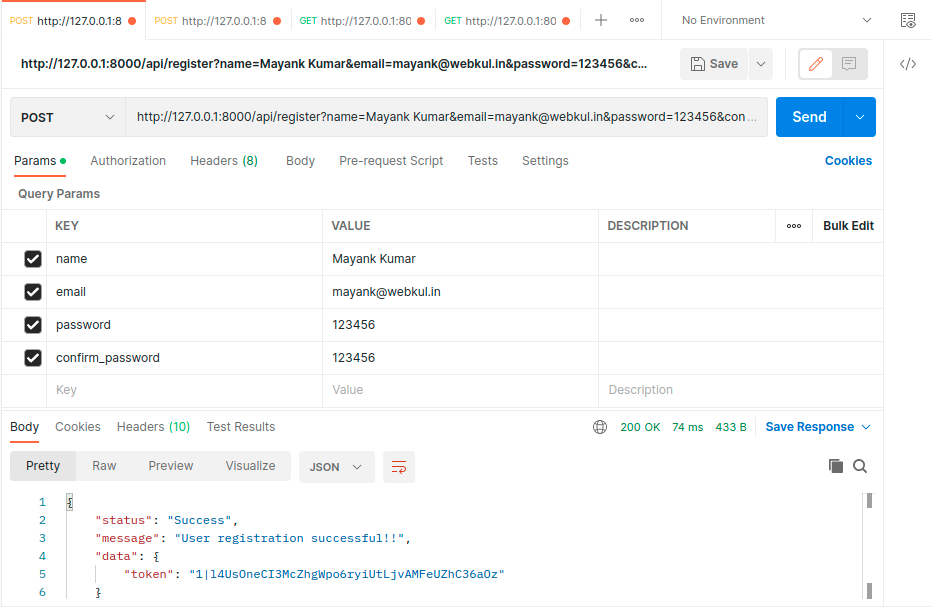
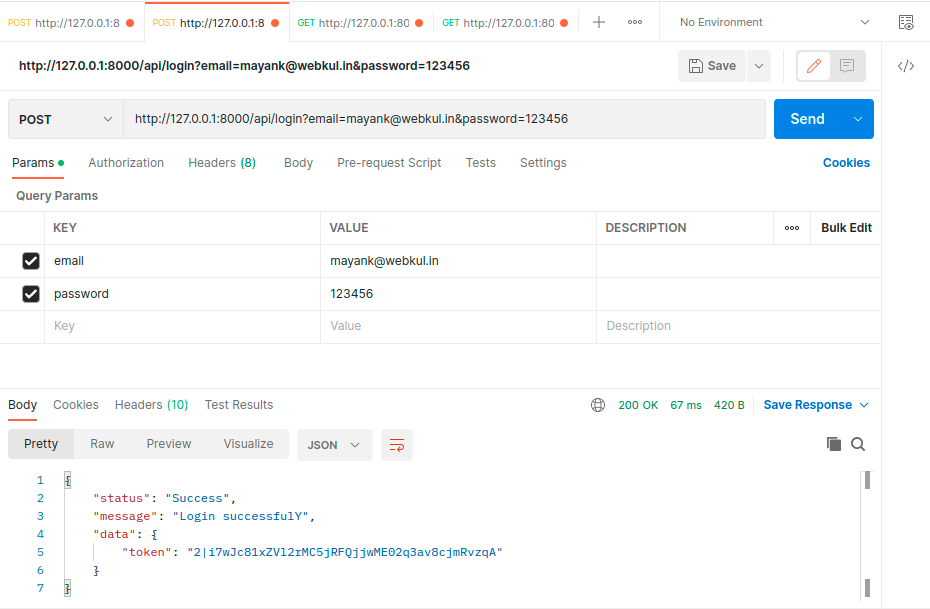
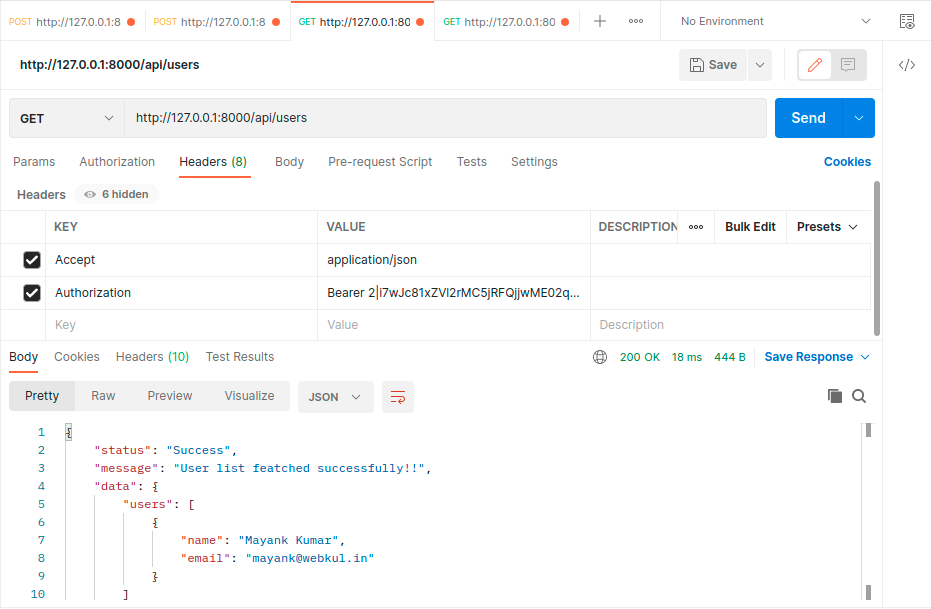
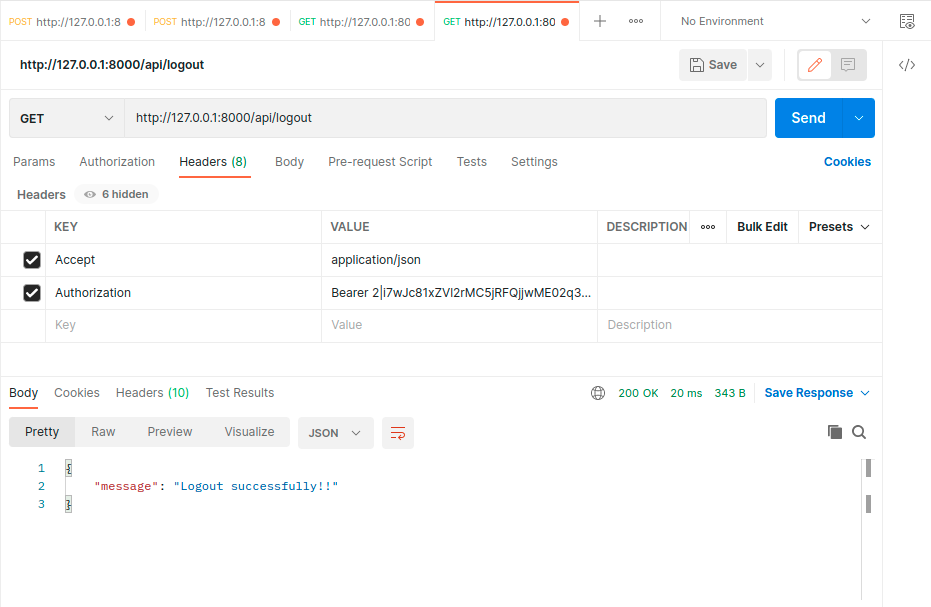
Here we are using postman for API testing please refer the below images for better understanding.
- First register your account.

- After registration is successful login to your account.

- Now try to get all user list from the user table. and don’t forget to send Bearer token in header that you get after login.

- Now logout if you want.

Thank you for reading this tutorial. We hope you found it helpful. If you have any questions or encounter any issues, please feel free to leave a comment below.
Additionally, if you’re looking to hire Laravel developers, you can visit the Hire Laravel Developer page. This platform provides a pool of experienced Laravel developers who can help you with your project requirements and ensure the successful implementation of your ideas.
Furthermore, if you’re interested in enhancing the functionality of Bagisto, you can check out the Extensions page on the official Bagisto website. This page showcases a wide range of extensions that can be integrated into your Bagisto e-commerce platform to add new features, improve user experience, and optimize your online store’s performance.


Be the first to comment.