Laravel ShipRocket Shipping integrates ShipRocket with Bagisto.
It provides live courier rates at checkout, automatically sends shipments to ShipRocket, and allows admins to print shipping labels.
Note: A Bagisto store and ShipRocket account with API access are required.
Create a dedicated API user in ShipRocket under Settings → API → Configure. The regular login will not authenticate against the ShipRocket API.
Features:
- Admin can enable or disable the ShipRocket shipping method per channel.
- Admin can configure the shipping method title and description displayed on the storefront.
- Every courier ShipRocket can service for the delivery pincode is offered as its own rate at checkout.
- Admin can configure the ShipRocket credentials and select a pickup location from the account.
- Admin can quote couriers for cash on delivery or for prepaid orders.
- Admin can set the default package weight and dimensions used when the cart carries none.
- Shipping can be configured for all supported countries or limited to specific countries.
- The ShipRocket order is created and its AWB assigned automatically when a shipment is created.
- Admin can generate and download the shipping label for a shipment.
- The AWB number is added as a searchable column on the shipments listing.
Laravel ShipRocket Shipping Installation
Bagisto Version: v2.4.x
Step 1: Extract Package
Unzip the extension package and merge the packages folder into your project root.
Step 2: Register Service Provider
Go to: bootstrap/providers.php file and add the following line under ‘providers’
|
1 2 3 4 5 |
use Webkul\ShipRocketShipping\Providers\ShipRocketShippingServiceProvider; return [ ShipRocketShippingServiceProvider::class, ] |
Step 3: Update the composer.json File
Open the composer.json file and add the following line under the ‘psr-4’ section:
|
1 |
"Webkul\\ShipRocketShipping\\": "packages/Webkul/ShipRocketShipping/src" |
Run these commands below to complete the setup
|
1 |
composer dump-autoload |
|
1 |
php artisan shiprocket:install |
Admin Configuration
Navigate to: Admin → Configure → Sales → Shipping Methods → ShipRocket
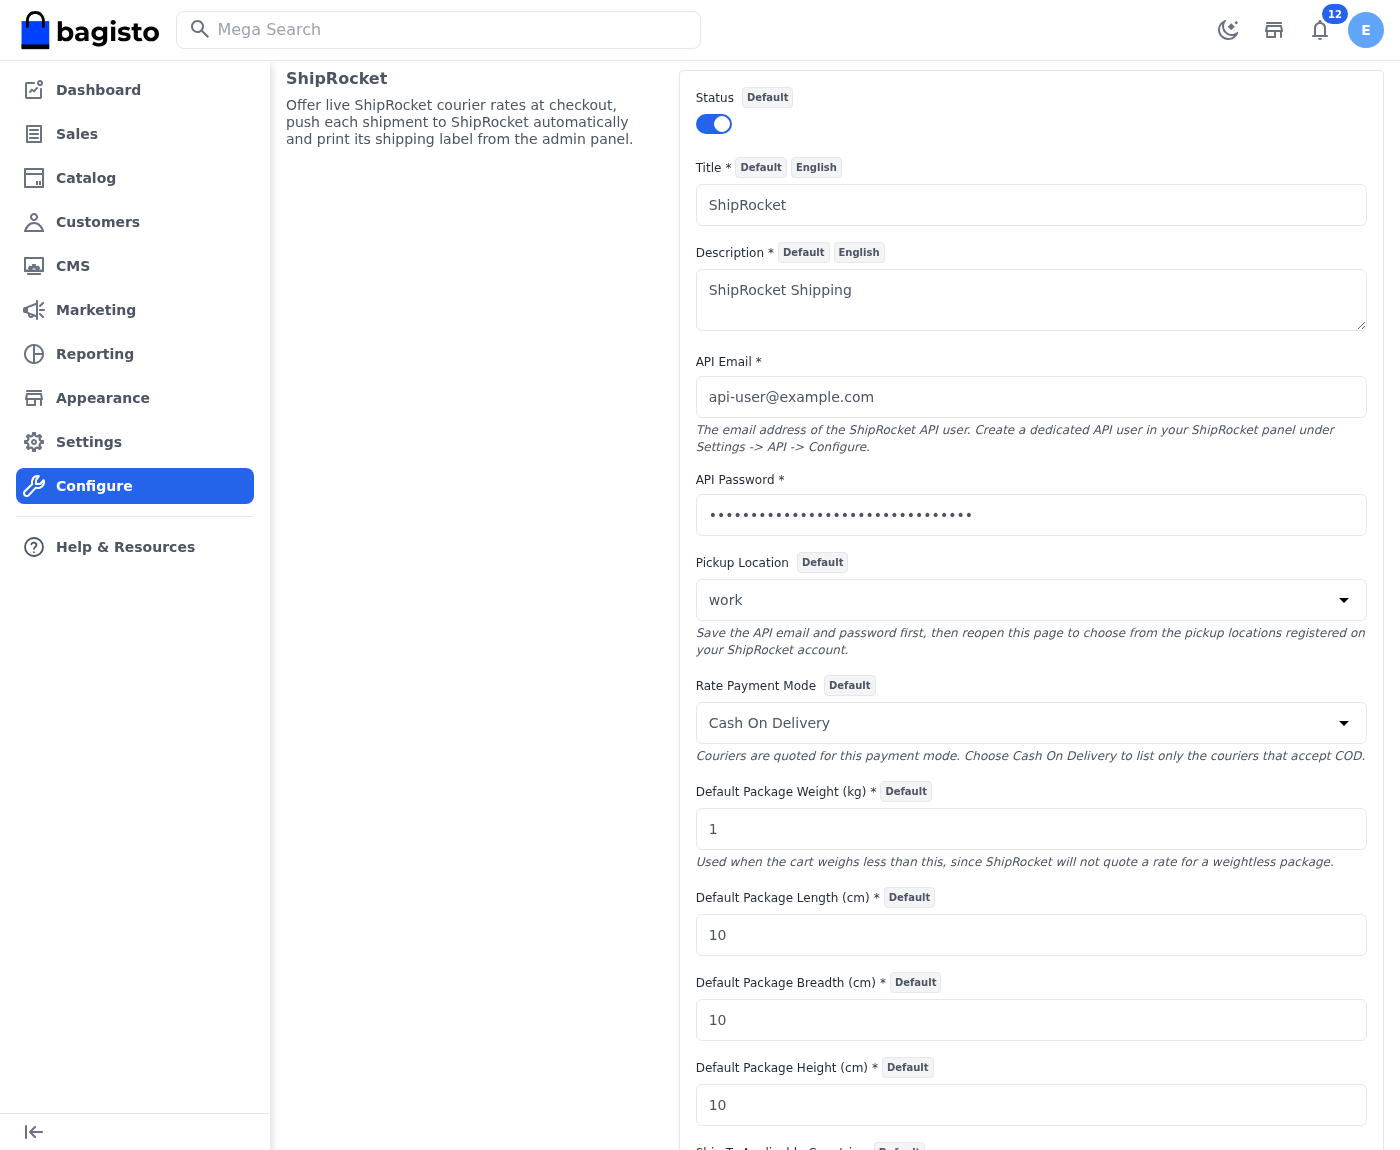

Configure the following settings:
Status: Enable or disable the ShipRocket shipping method.
Title: Name displayed to customers during checkout.
Description: Text shown below the shipping method at checkout.
API Email: Email address of the ShipRocket API user used for authentication.
API Password: Password of the ShipRocket API user used for authentication.
Pickup Location: Select the pickup address fetched from ShipRocket.
Rate Payment Mode: Quote couriers for Cash On Delivery or for Prepaid orders.
Default Package Weight (kg): Used when the cart weighs less than this, since ShipRocket will not quote a rate for a weightless package.
Default Package Length / Breadth / Height (cm): Package dimensions sent with the ShipRocket order.
Ship To Applicable Countries: Choose whether shipping is available for all countries or specific ones.
Specific Countries: List of countries where shipping is available when restricted mode is enabled.
Show Method If Not Applicable: Shows a message at checkout when no courier can deliver to the address.
Displayed Error Message: Custom message shown when shipping is unavailable.
Note: Save the API Email and Password before selecting a Pickup Location. Reopen the configuration page to load the available pickup locations from ShipRocket.
Currency Configuration
ShipRocket quotes every rate, and reads every amount sent to it, in Indian Rupees.
Navigate to: Admin → Configure → Currencies → Exchange Rates
Unless the channel base currency is already INR, add an exchange rate with INR as the target currency.
Note: This exchange rate is required for currency conversion.
Without it, a courier rate of ₹237.15 may be shown incorrectly in the store currency. The order value sent to the courier may also be incorrect.
Checkout
When customers reach the checkout page, the system automatically:
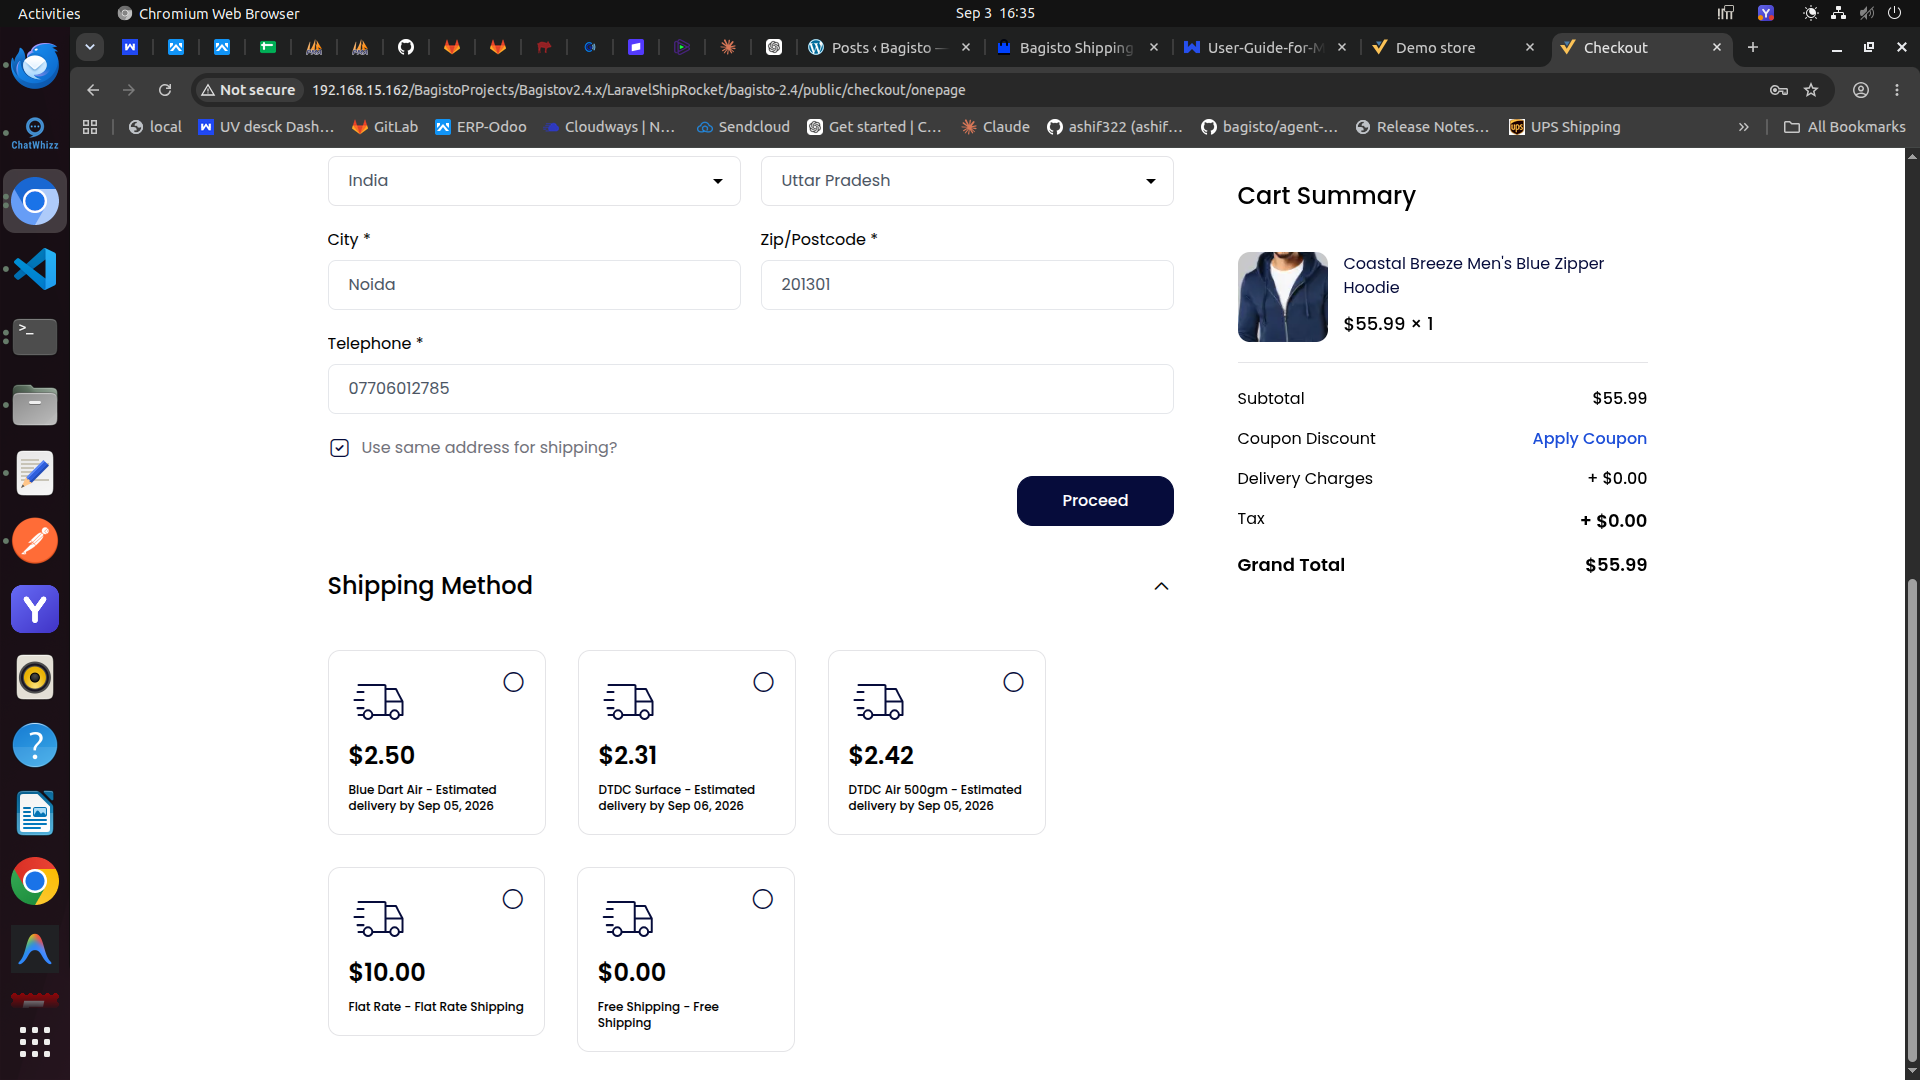

- Sends the delivery pincode and cart weight to ShipRocket.
- Retrieves every courier service able to deliver to that address.
- Displays one live shipping rate per courier, based on:
- Pickup location
- Delivery address
- Cart weight
- Cash on Delivery availability
- Shows the estimated delivery date returned for each courier.
If shipping is unavailable for the selected address, the shipping method is either hidden or shown with an error message, based on the admin configuration.
Shipment Processing
When an administrator creates a shipment, the module automatically sends the shipment information to ShipRocket.
The ShipRocket order is created first, and the AWB is then booked against the exact courier the customer selected at checkout.
The AWB is stored as the tracking number of the shipment, so the customer sees it on their order.
Note: Nothing is sent to ShipRocket when the order is placed. The push happens on shipment creation, because it carries the shipped items and their quantities.
Shipping Label Generation
After a shipment has been synchronized with ShipRocket, shipping labels can be generated directly from the application.
Admin Panel
Navigate to: Sales → Shipments → View
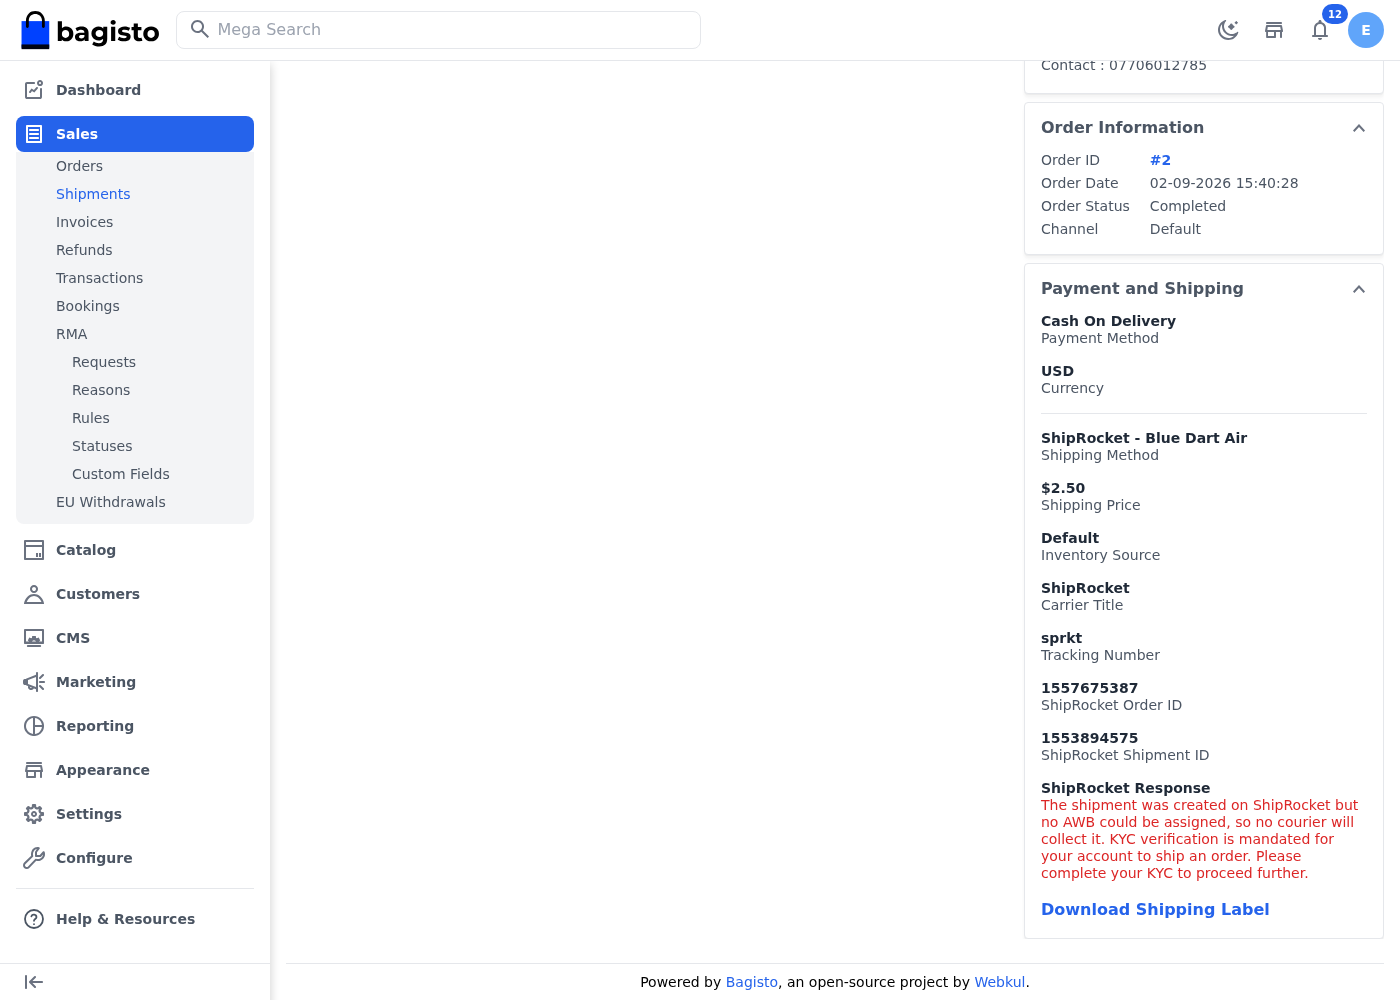

If the shipment has been successfully synchronized, a Download Shipping Label option will be available.
The shipment view also shows the ShipRocket Order ID, the ShipRocket Shipment ID and the assigned courier.
If ShipRocket refuses the booking, the ShipRocket Response field shows the reason it gave, so the failure does not have to be traced through the log.
The downloaded label can be printed and attached to the shipment before dispatch.
Support
So, that was much about the User Guide of Laravel ShipRocket Shipping. For any queries or doubts reach out to us at support@webkul.com.
You can also raise a ticket at our HelpDesk System.
Please explore our Laravel Development Services and Quality Bagisto Extensions.

