Bagisto module development is a great way to improve and customize your eCommerce store without modifying the core files.
In this easy to follow guide, you will discover how to create a custom module in Bagisto from the ground up.
The steps are made to be straightforward, even for those just starting, and they follow a modular style so that each feature can work on its own.
In this guide, we will go through every step of Bagisto module development.
Including setting up the module, organizing folders, configuring settings, and basic implementation.
Bagisto Module Development Guide: Step by Step
Here, we will explain step by step how you can create a custom module in Bagisto.
Step 1: Create Package Structure
Inside the packages folder of Bagisto, create a folder of your company namespace and inside it, create a folder with your package name.
Ex : packages/ACME/HelloWorld
Step 2: Create package.json
Inside your package, create a package.json file to define configuration and dependencies.
If you want to do it quickly via terminal, you can also run:
|
1 |
npm init -y |
This automatically generates a basic package.json file for you.
Step 3: Create Service Provider
Create an src folder inside HelloWorld. Next, create a Providers folder inside src and add a file named PackageNameServiceProvider.php.
Ex : HelloWorldServiceProvider.php
The HelloWorldServiceProvider.php file mainly contains two methods: boot() and register().
- Boot
- Register
|
1 2 3 4 5 6 7 8 9 10 11 12 13 14 15 16 17 18 19 20 21 22 23 24 25 26 27 28 29 30 31 32 33 34 |
<?php namespace ACME\HelloWorld\Providers; use Illuminate\Support\ServiceProvider; /** * HelloWorld service provider * * @author Jane Doe <janedoe@gmail.com> * @copyright 2018 Webkul Software Pvt Ltd (http://www.webkul.com) */ class HelloWorldServiceProvider extends ServiceProvider { /** * Bootstrap services. * * @return void */ public function boot() { } /** * Register services. * * @return void */ public function register() { } } |
Step 4: Register Service Provider
Register your package’s service provider in the bootstrap/providers.php file located in the root directory of your Bagisto application.
Add the following line Webkul\HelloWorld\Providers\RMAServiceProvider::class, just like other Bagisto service providers:
|
1 2 3 4 5 6 7 8 9 10 11 12 13 14 15 16 17 |
<?php return [ /** * Application service providers. */ App\Providers\AppServiceProvider::class, /** * Webkul's service providers. */ /** * ACME service providers. */ ACME\Helloworld\Providers\HelloworldServiceProvider::class, ]; |
Step 5: Composer Autoload Setup
Next, add your package to the composer.json file in the project root directory for PSR 4 autoloading.
Open the composer.json file and add the following line under the psr 4 section.
|
1 |
"ACME\\HelloWorld\\": "packages/ACME/HelloWorld/src" |
Step 6: Routes Setup
Now we are going to add some routing & views to our package.
For routes, create an Http folder inside the src directory of your package. Then, create a routes.php file inside the Http folder.
This file defines your package routes and lets you organize them into admin, shop, or separate folders.
Next, register the route file inside the boot() method of HelloWorldServiceProvider.php.
|
1 2 3 |
public function boot(){ include __DIR__ . '/../Http/routes.php'; } |
You can also use the loadRoutesFrom() method to load route files in a cleaner and more structured way.
Step 7: Create View Route
Next, create a route and render a view for it. Inside the routes.php file, add a simple route that loads the helloworld.blade.php view.
|
1 2 3 |
<?php Route::view('/hello world', 'helloworld::helloworld.helloworld'); |
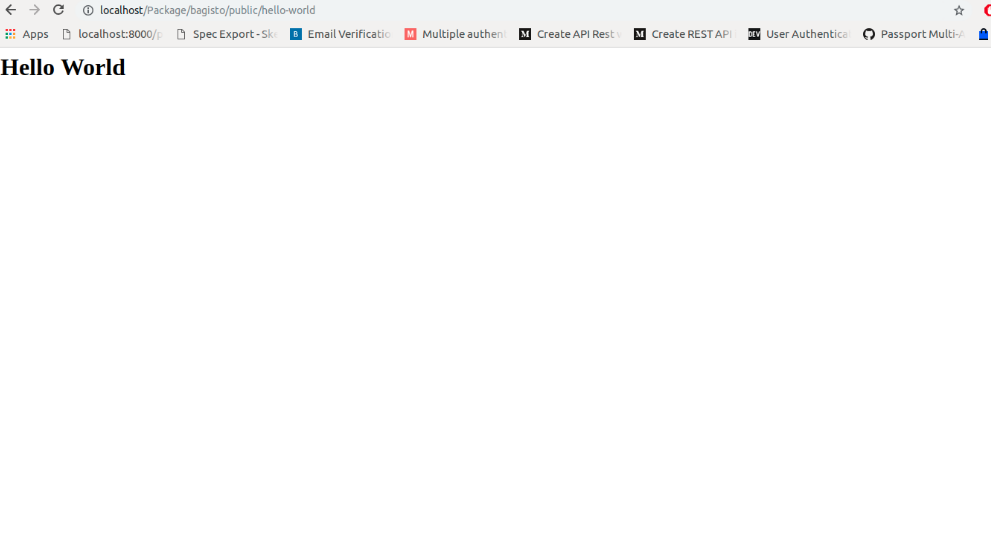
This loads a Bagisto Blade view from your module.
Now, open the hello world URL in your browser to view the output.

Step 8: Language Support
Create a lang folder inside Resources and add language folders like en and hi for translations.
For now, create an en folder inside the lang directory and add an app.php file inside it.
Next, register the language files in the service provider, just as you registered the routes earlier.
|
1 2 3 |
public function boot() { $this>loadTranslationsFrom(__DIR__ . '/../Resources/lang', 'helloworld'); |
Now we can write a translation in this file like below.
|
1 2 3 4 5 6 7 |
<?php return [ 'hello world' => [ 'name' => 'Jane Doe' ] ]; |
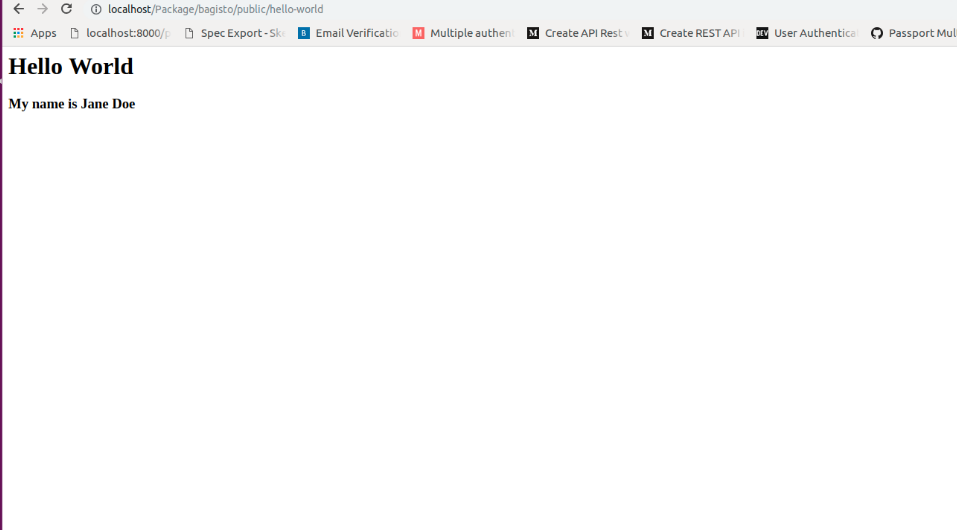
Add {{ __('helloworld::app.hello world.name') }} in your Blade file to auto translate text based on the selected language.
This enables Bagisto multi language translation support, allowing content to adapt to different languages automatically.

Step 9: Views & Assets Setup (CSS/JS)
Create a Resources folder inside the src directory of your package. Then, create a views folder inside Resources to store your package view files.
Next, create a helloworld folder inside:
|
1 2 3 4 |
public function boot() { $this>loadViewsFrom(__DIR__ . '/../Resources/views', 'helloworld'); } |
Next, add CSS support to your package. For this, create a package.json file and a webpack.mix.js file in the root directory of your package.
Inside the src/Resources directory, create an assets/sass folder and add an app.scss file inside it.
The app.scss file contains the SASS styles for your package, while the package.json file stores the npm dependencies.
Create a webpack.mix.js file to compile your package assets.
The package.json file contains your project dependencies and configuration settings.
|
1 2 3 4 5 6 7 8 9 10 11 12 13 14 15 16 |
{ "scripts": { "dev": "npm run development", "development": "cross env NODE_ENV=development node_modules/webpack/bin/webpack.js --progress --hide-modules --config=node_modules/laravel-mix/setup/webpack.config.js", "watch": "cross-env NODE_ENV=development node_modules/webpack/bin/webpack.js --watch --progress --hide-modules --config=node_modules/laravel-mix/setup/webpack.config.js", "watch-poll": "npm run watch -- --watch-poll", "hot": "cross-env NODE_ENV=development node_modules/webpack-dev-server/bin/webpack-dev-server.js --inline --hot --config=node_modules/laravel-mix/setup/webpack.config.js", "prod": "npm run production", "production": "cross-env NODE_ENV=production node_modules/webpack/bin/webpack.js --no-progress --hide-modules --config=node_modules/laravel-mix/setup/webpack.config.js" }, "devDependencies": { "cross-env": "^5.1.4", "laravel-mix": "^2.1", "laravel-mix-merge-manifest": "^0.1.1" } } |
The webpack.mix.js file contains the asset compilation configuration for your package.
|
1 2 3 4 5 6 7 8 9 10 11 12 13 14 15 16 17 18 19 20 |
const { mix } = require("laravel-mix"); require("laravel-mix-merge-manifest"); if (mix.inProduction()) { var publicPath = 'publishable/assets'; } else { var publicPath = "../../../public/vendor/acme/helloworld/assets"; } mix.setPublicPath(publicPath).mergeManifest(); mix.disableNotifications(); mix.sass(__dirname + "/src/Resources/assets/sass/app.scss", "css/helloworld.css") .options({ processCssUrls: false }); if (mix.inProduction()) { mix.version(); |
All dependencies can be updated as per your requirements.
Go to the package root and run npm install to install dependencies. After that, run npm run watch to compile and publish the CSS files
Similarly, you can add JavaScript and images by creating js and images folders inside the Resources/assets directory.
Add the app.js file inside the js folder and store your required images inside the images folder.
Next, publish these files just like the CSS files by adding their configuration to the webpack.mix.js file.
|
1 2 |
mix.js(__dirname + "/src/Resources/assets/js/app.js", "js/helloworld.js") .copyDirectory( __dirname + '/src/Resources/assets/images', publicPath + '/images') |
Run npm run watch again to compile the assets.
Next, add an event listener in the service provider to load the CSS in the admin layout.
Then, create a layouts folder inside views and add a style.blade.php file to include the compiled CSS path.
|
1 2 3 |
<link rel="stylesheet" href="{{ bagisto_asset('css/helloworld.css') }}"> ( In style.blade.php) |
For Event Listener
|
1 2 3 4 5 6 |
public function boot() { Event::listen('bagisto.admin.layout.head', function($viewRenderEventManager) { $viewRenderEventManager>addTemplate('helloworld::helloworld.layouts.style'); }); } |
Now, extend admin::layouts.master inside your package views to load and apply your package CSS.
Step 10: Database (Migrations)
Next, add database support to your package. Create a Database folder inside the src directory, then create Migrations and Seeders folders inside it.
Create the required tables inside Migrations and add seeders inside the Seeders folder. Then, register the migrations in the service provider.
|
1 2 3 4 |
public function boot() { $this>loadMigrationsFrom(__DIR__ .'/../Database/Migrations'); } |
These are the basic steps to create a custom package in Bagisto.
Step 11: Controllers
For controllers, create a Controllers folder inside the Http directory and add a base Controller.php file.
You can create all your package controllers inside this folder.
|
1 2 3 4 5 6 7 8 9 10 11 12 13 |
<?php namespace ACME\HelloWorld\Http\Controllers; use Illuminate\Foundation\Bus\DispatchesJobs; use Illuminate\Routing\Controller as BaseController; use Illuminate\Foundation\Validation\ValidatesRequests; use Illuminate\Foundation\Auth\Access\AuthorizesRequests; class Controller extends BaseController { use AuthorizesRequests, DispatchesJobs, ValidatesRequests; } |
Step 12: Admin Menu Integration
Next, add a menu to the admin panel. Create a Config folder inside src and add a menu.php file inside it.
|
1 2 3 4 5 6 7 8 9 10 11 |
<?php return [ [ 'key' => 'helloworld', 'name' => 'Hello World', 'route' => 'helloworld.index', 'sort' => 9, 'iconclass' => 'dashboard icon', ] ]; |
In this file, define the menu name, route, and icon class. Next, create a controller for the specified route.
Inside the Controllers folder, create a HelloWorldController.php file.
|
1 2 3 4 5 6 7 8 9 10 11 12 13 14 15 16 17 18 19 20 21 22 23 24 |
<?php namespace ACME\HelloWorld\Http\Controllers; class HelloWorldController extends Controller { protected $_config; public function __construct() { $this>_config = request('_config'); } /** * Display a listing of the resource. * * @return \Illuminate\Http\Response */ public function index() { return view($this>_config['view']); } } |
For the route, we will create a named route as
|
1 2 3 4 |
Route::get('hello dashboard', 'ACME\HelloWorld\Http\Controllers\HelloWorldController@index') >defaults('_config', ['view' => 'helloworld::helloworld.index' ])>name('helloworld.index'); |
After creating the controller and route, merge menu.php into the Bagisto admin menu using mergeConfigFrom().
|
1 2 3 4 5 6 |
public function register() { $this>mergeConfigFrom( dirname(__DIR__) . '/Config/menu.php', 'menu.admin' ); } |
This adds your module inside the bagisto admin menu.
NOTE:
Once your package is set up, you can start building its functionality.
As this allows you to understand each component registration process step by step – such as routes, views, models, and controllers etc.

